The Follow Feature is optimal if you want to display Sonday System slides on a separate device or devices in your classroom or for remote students who have slower internet connections.
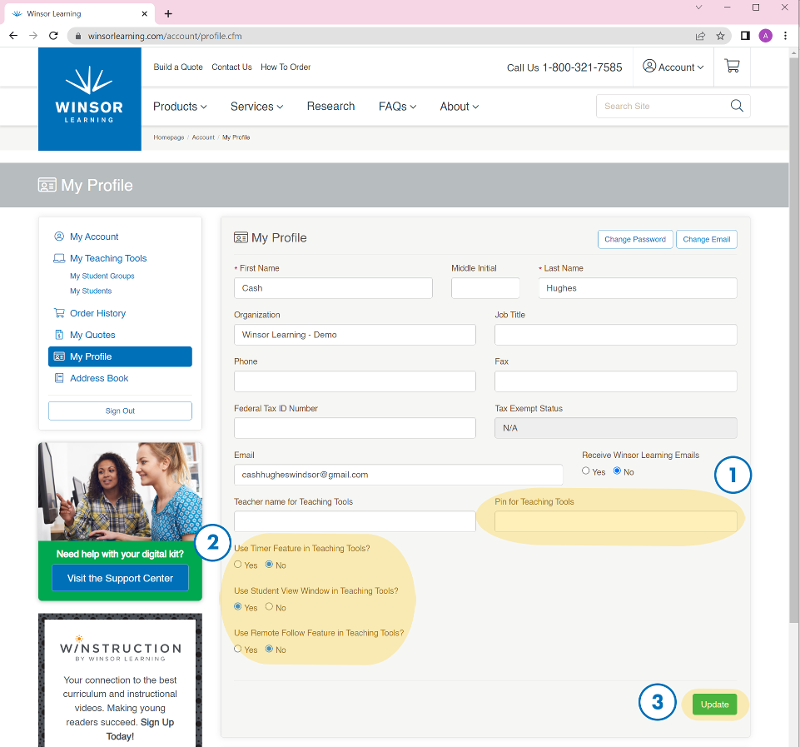
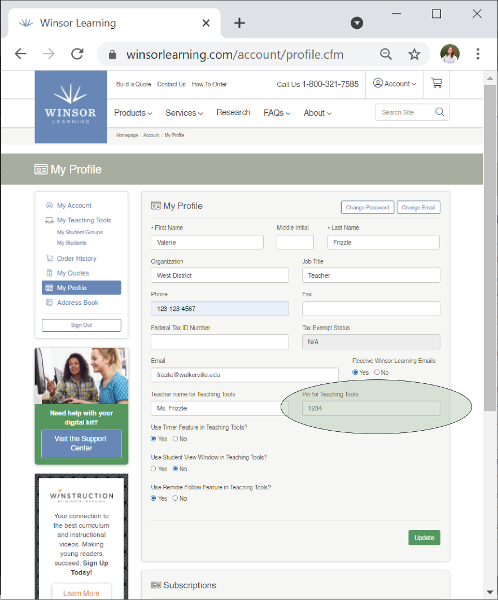
- Enter a 4-6 digit PIN. This PIN will be used to unlock "Teacher Mode" for screensharing in the classroom. You can view or edit your PIN at any time by returning to your profile.
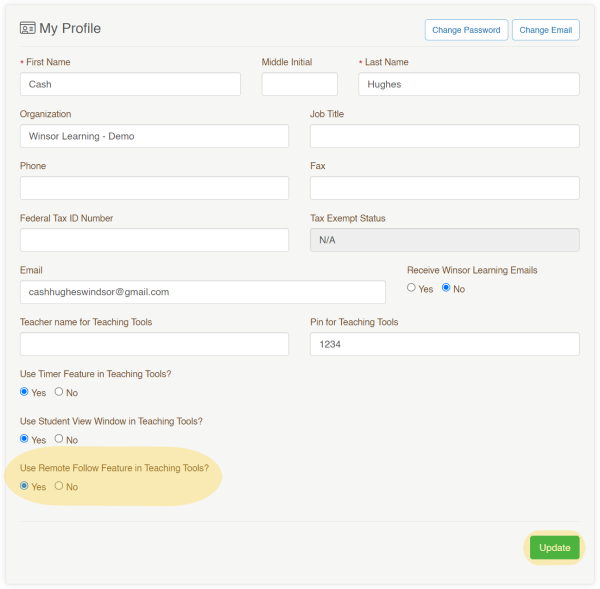
- Click the button next to Yes under Use Remote Follow Feature in Teaching Tools? We also strongly recommend turning off the Student Window if you are using the Follow Feature exclusively to share slides.
- Click the green Update button when you are done.
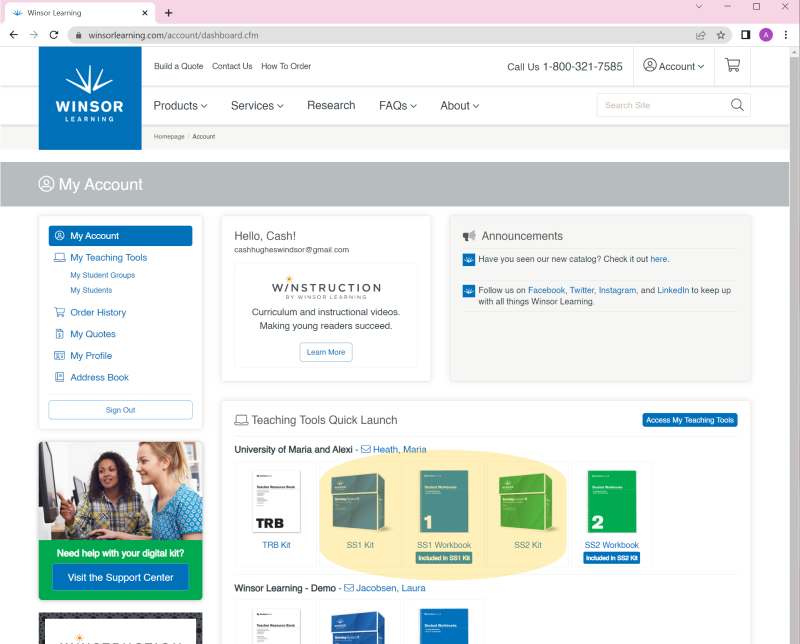
Once you've set your PIN and activated the Follow Feature, you will need to create a unique Follow Code for each Student Group you plan on using the Follow Feature with. Return to your Winsor account page by clicking My Account from the menu on the left side of your screen.
Open your SS1 or SS2 Kit.
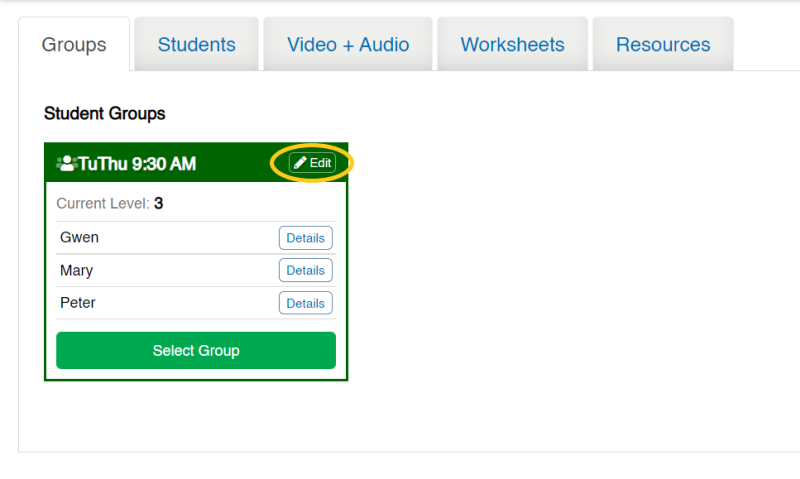
Click Edit for the group you need to create a Follow Code for.
Create the group's Follow Code and enter it here. Follow Codes must be globally unique. The system will notify you if the code you entered is already in use. Click the green Save Changes button when you are done. The Follow Feature is now ready to be used.
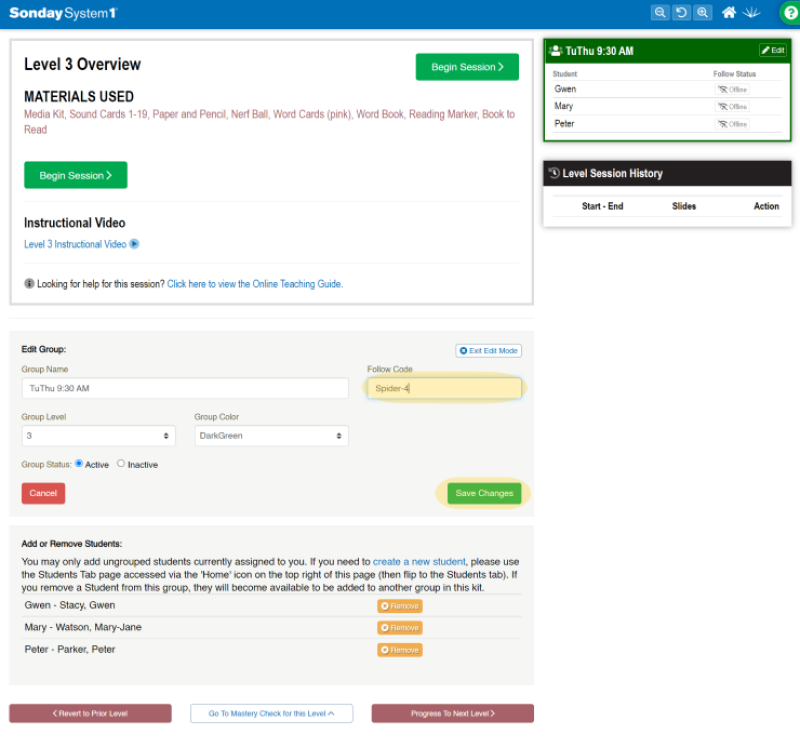
If your students will be using the Follow Feature remotely, you will need to share the Follow Code with them verbally, via email, or through your preferred method of communication.
Instructions for Students Using the Follow Feature to View Slides Remotely
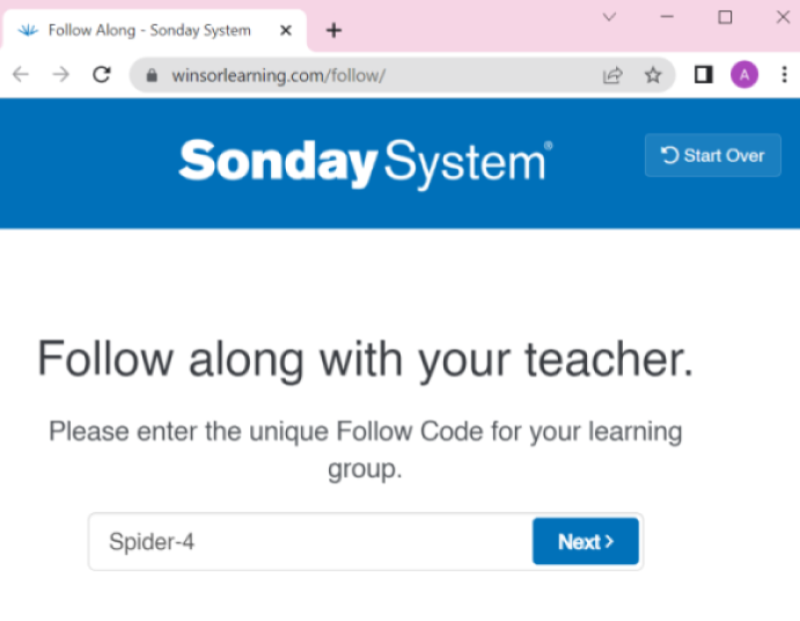
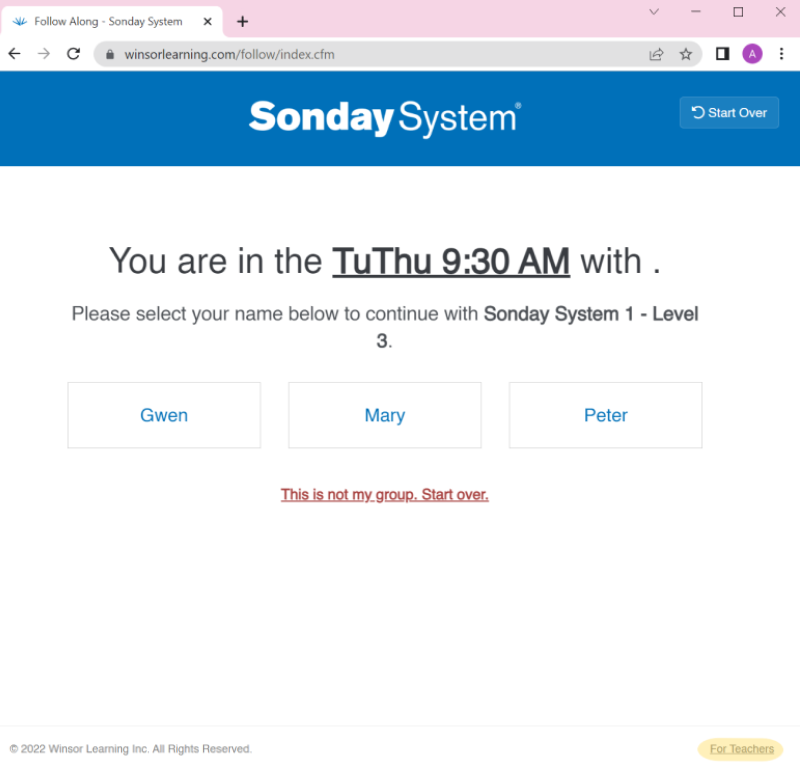
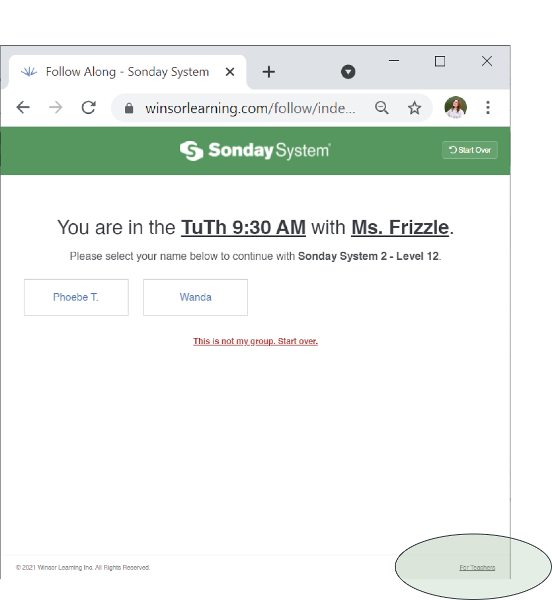
Have the student go to winsorlearning.com/follow, enter the Follow Code you have created and shared with them, and click Next .
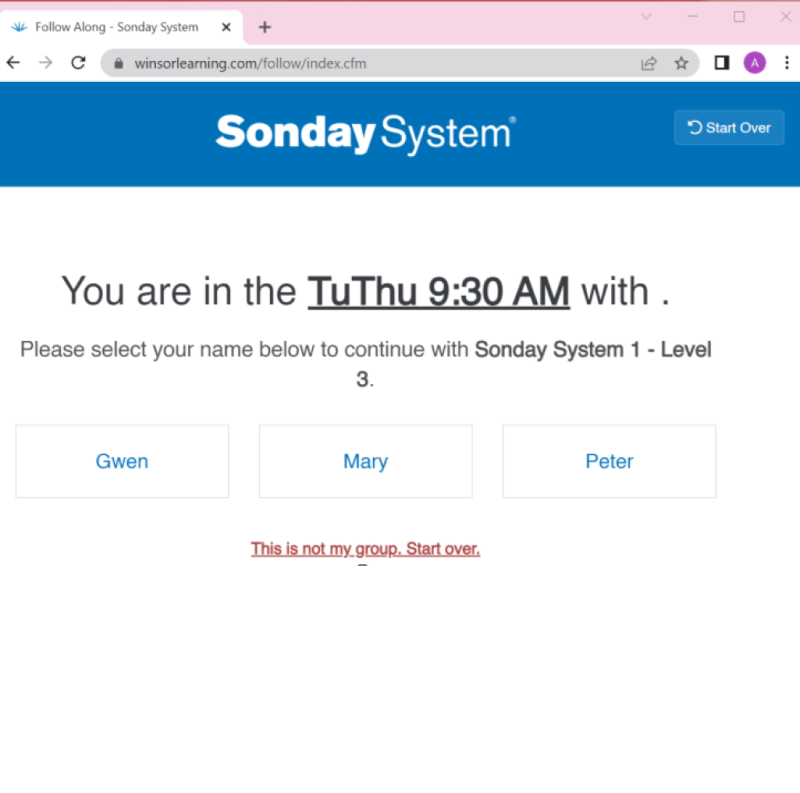
The student will then select their name from the list.
The student will now be able to see the slides from your Slide Controller. Have the student click Refresh in the top right corner of the screen if there are connectivity problems.
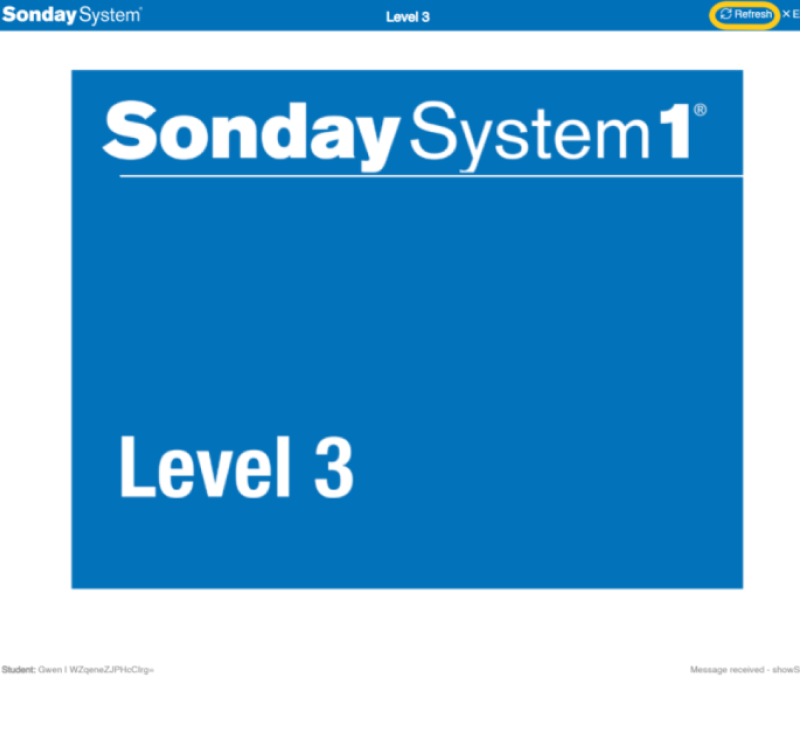
Instructions for Teacher Using the Follow Feature to Display Slides on a Separate Device
Go to winsorlearning.com/follow on the device you will be using to display slides, enter the group's unique Follow Code, and click Next .
In the bottom right corner of your screen, click the link that reads For Teachers.
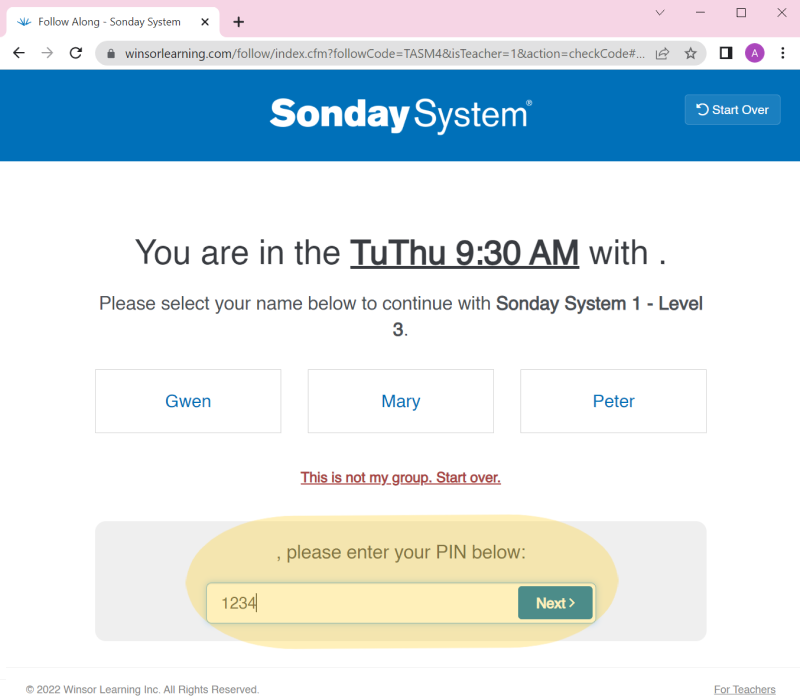
Enter your PIN and click Next ..
The device will now display and automatically update slides from your Slide Controller.

To assign a student to a group from their profile:
- Log into your account at winsorlearning.com and click My Students under My Teaching Tools on the left side of your screen.
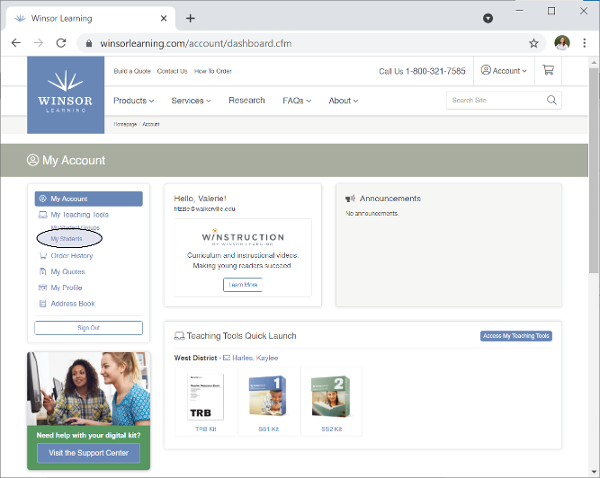
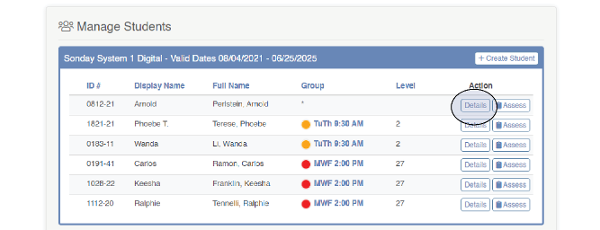
- Click Details next to the name of the student you want to move.
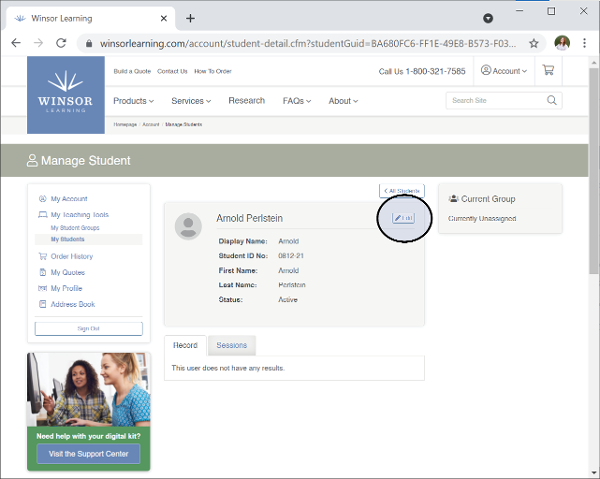
- Click Edit in the top right corner of the student's contact card.
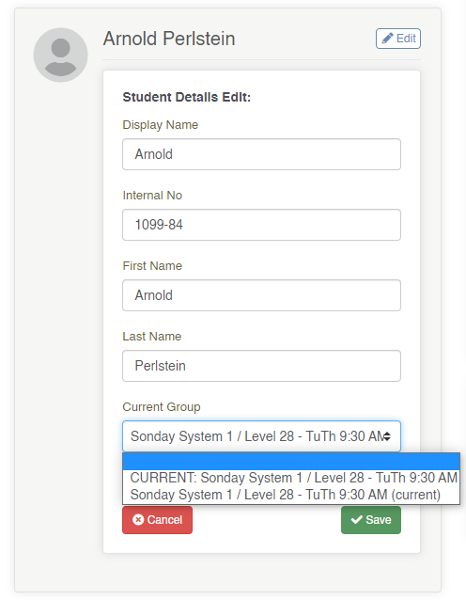
- At the bottom of the profile, under Current Group: select the blank option from the dropdown menu and click the green Save button.
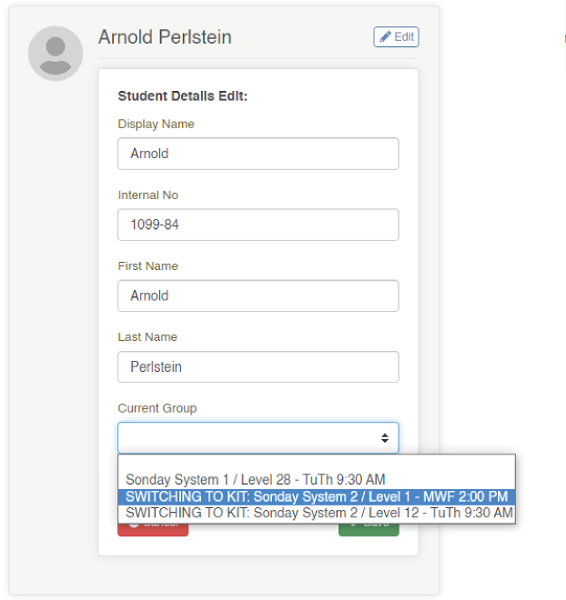
- Click Edit again.

- Groups from other kits will now be available on the dropdown menu and will begin with SWITCHING TO KIT. Make your selection and click the green Save button again.
Digital versions of the Sonday System 1 and Sonday System 2 Readers are available for purchase. Reach out to info@winsorlearning.com for more information.
Sonday System online can be used with most major screen sharing platforms. We recommend Zoom as the platform that works best with our program. Google Meet is the next best option.
The Sonday System product line was designed to be easy to use and to replicate in the classroom. Students learn best in small, homogeneous groups. Everything needed for instruction is contained in a small, easy to manage kit. The lesson plans are done for you! The program is designed to progress at the student’s pace. It is not a scripted curriculum; rather it is a sequential, systematic, multisensory, and cumulative diagnostic program that any teacher, para, tutor, or parent can use successfully with struggling learners.
In general yes, any sharing platform should work but there are always exceptions.
Most users find that Zoom is the best option to use with the Sonday System.
All three items are included and do not need to be purchased separately.
The digital version of the Teacher Resource Book can be found listed as "TRB Kit" in your Teaching Tools after logging into your Winsor account.
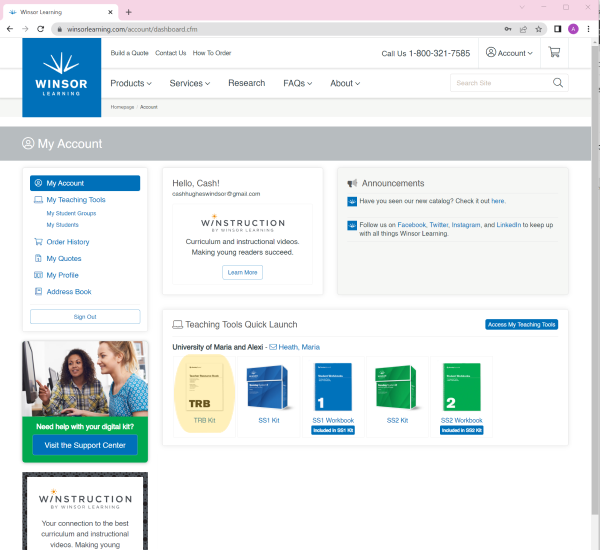
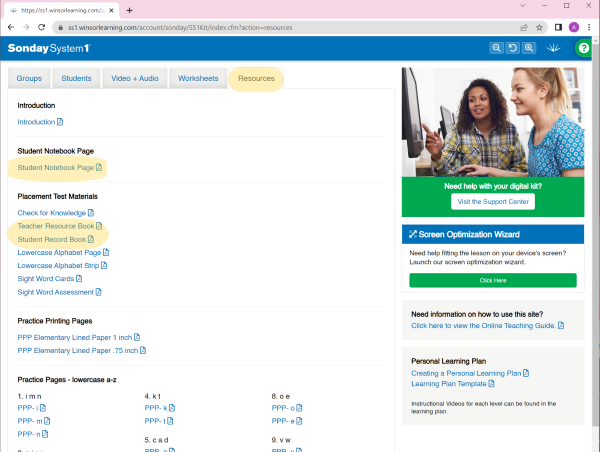
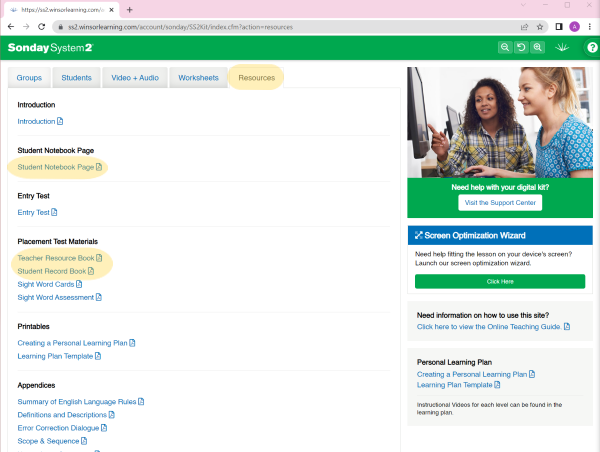
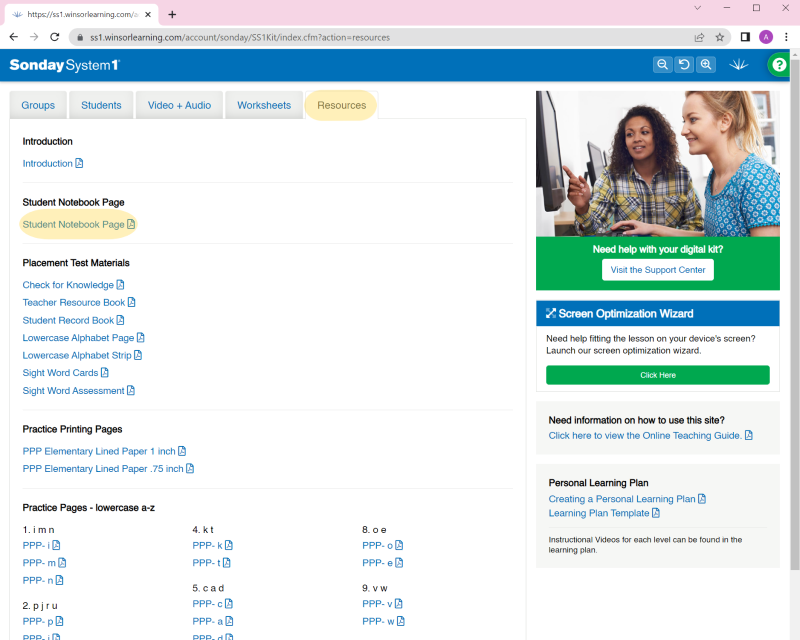
PDFs of all three items (Teacher Resource Book, Student Record Book, and Student Notebook) can be downloaded and printed from the Resources tab of your SS1 and SS2 Kits.
The Sonday System won’t work as well if the spelling component is omitted. NIH (National Institutes of Health) research suggests that spelling is an important component of successful reading programs. Spelling dictation is a focused multisensory activity that cements learning into long-term memory. It enables the diagnostic teacher to constantly monitor responses and know which sounds, rules, or generalizations still need practice or reteaching. Without the spelling component, reinforcement and accurate monitoring suffer.
Reading is usually easier than spelling because reading words requires decoding the symbols that can be seen on the page, whereas spelling requires the student to determine the correct symbols and put them on paper in the right order while observing the rules of the language. Sometimes it seems that reading is harder than spelling because there is no time limit for spelling, whereas we expect a student to look at a word and read it immediately. Regardless of the reason, it may be necessary to provide students with more opportunities to practice reading words in isolation, in phrases, in sentences, and in text. Some students need only 50 repetitions to remember a word, and some need 550 repetitions or more before a word reaches the automatic level of recognition.
When working with a small group of students in a school setting, five times a week is best. If the goal is to close the gap, intensive focus and frequent opportunities to practice are required. If students are working after school, two or three times a week may be the best that can be arranged. Fatigue and activities are factors in after-school schedules. Once a week is not enough, because it requires students to hold on to new learning for 7 days without review.
The time to complete the program depends on several variables:
- Age or grade level of students
- Skill level of students when entering the program
- Cognitive ability
- English language proficiency
- Number of students in the group
- Frequency of instructional sessions
- Opportunities to practice
- Independent reading time
- Teacher expertise/experience
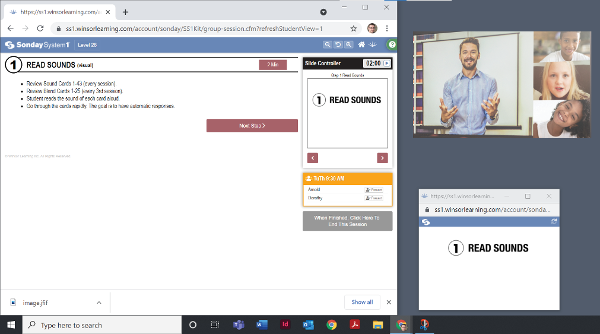
We recommend rearranging the windows on your screen so that the Lesson Plan with the Slide Controller is on one side, and the Student Window and video sharing platform (with your students) are on the other side. The windows can also be resized so your students take up a larger portion of the screen, and you can also keep an eye out on the Student Window to ensure it is updating correctly. If you are using the Follow Feature to share screens, you do not need the Student Window open.
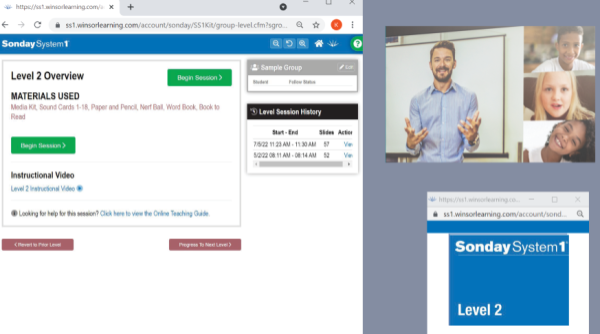
If you have the Sonday System 1 or Digital Kit, you should also have access to the TRB (Teacher Resource Book) Digital Kit.
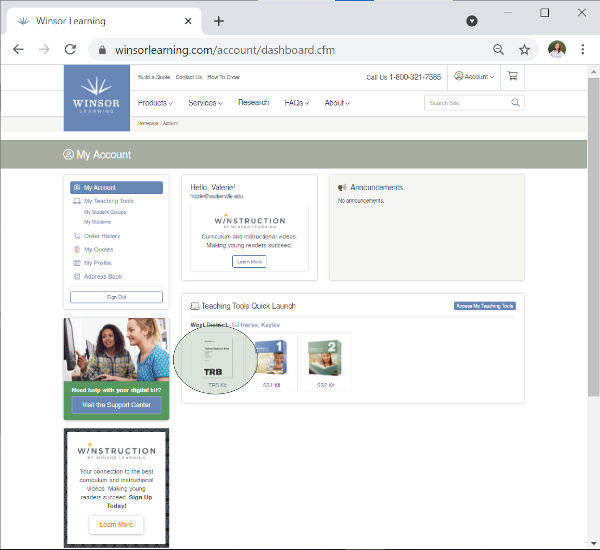
Log into your account at winsorlearning.com. Click on the TRB Kit under Teaching Tools Quick Launch.

The digital kits are designed to work with most internet browsers regardless of operating hardware. If you are having problems with your specific hardware, we recommend reaching out to your IT department or the manufacturer.
Sonday System (1 or 2) is an intervention tool that’s meant to be used one-on-one or in small groups. Students who are at the same or close to the same skill level in the Sonday System can be taught together in a small group, which is the main purpose behind grouping students together. If you’re planning on teaching a group of students at the same time, they should be placed in a group together. If you’re teaching one-on-one (which is very common), then you only need to assign that one student to the group.
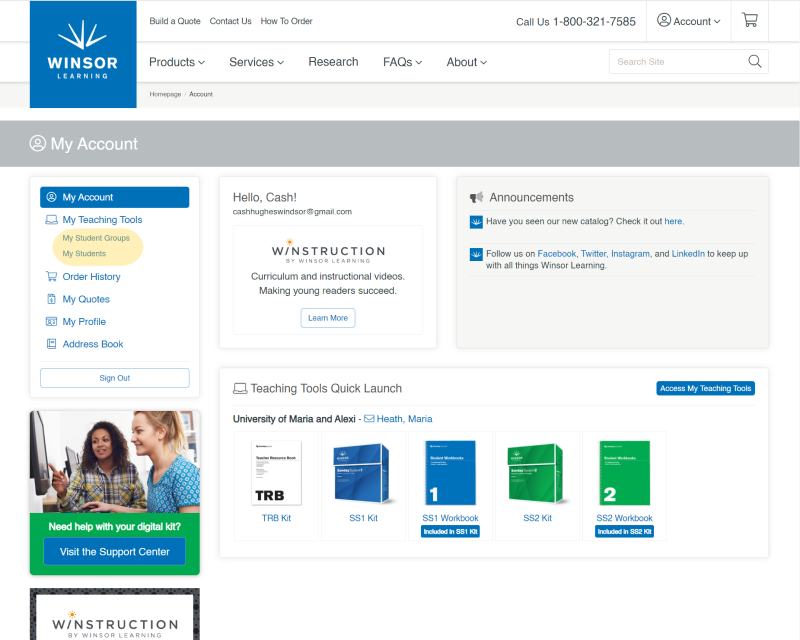
Your Winsor account will track a student's TRB test scores and session history. Session history can also be viewed by groups. You can access this information by clicking on Students and Student Groups under My Teaching Tools on the left side of the screen after logging into your Winsor account.
Groups cannot be deleted but can be set to Inactive.
To set a group's status to inactive, open your Sonday System 1 or 2 Kit (the one the group is currently assigned to).
This will take you to the Groups tab of your kit.
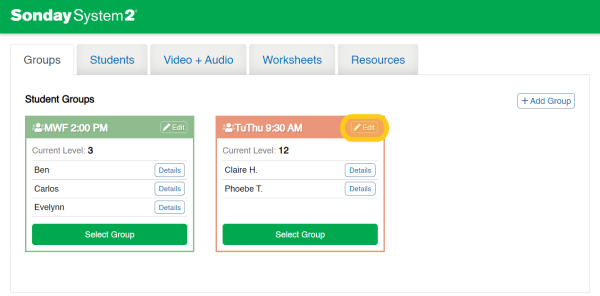
Click Edit for the group you wish to deactivate.
Next to Group Status under the Group Level, click on the bubble next to (1) Inactive and then click (2) Save Changes.
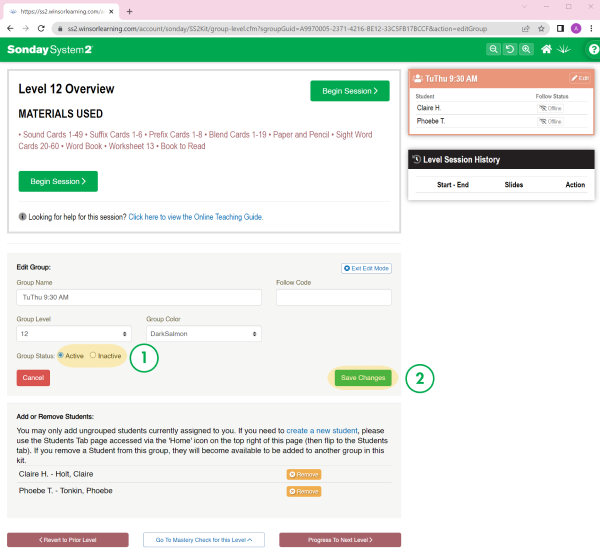
If you plan to reassign any of the students, click the orange Remove button next to each of their names. Otherwise, the students will still be assigned to the inactive group.

WebEx has very limited options for screen sharing. A premium account is required to access the ability to share just one application, and even then it will require you to share the entire browser, not just the student window. Unless you are required by your district to use WebEx, we generally recommend using Zoom.
The Learning Plan Books for Sonday System 1 and 2 are integrated into the online Sonday System Kits. The Learning Plan Book is not available as a separate digital product.
A physical copy of the book can be purchased individually through our website. Click the appropriate link below for more information.
Sonday System 1 Components
Sonday System 2 Components
While you can name the group whatever you like, we recommend labeling by meeting time (e.g. "Wednesday 1:00 PM") or by the group's assigned color.
If you are considering starting somewhere other than at the beginning, remember that determining where to start a student requires diagnostic expertise, knowledge of language structure sufficient to recognize gaps in the continuum, and the ability to intervene with corrective strategies. A teacher who isn’t trained in structured, systematic phonics may not receive the cues given by the learner or may not be able to intervene. We have created a Teacher Resource Book (both printed and digital versions) that offers a placement test across all Sonday System products. It also provides a baseline for the student. Use the below as a guideline for determining which test to administer for a particular student.
- Choose Pre-Reading Survey to assess a non-reader or a student in Pre-K through 3rd grade.
- Choose Sonday System 1 Pre- and Post-Tests to assess skills of a student in 4th grade or above, or who scored above 85 on the Pre-Reading Survey. The test can also be used to monitor progress of a current Sonday System 1 student.
Note: Pre- and Post-Tests do not provide recommendations for Sonday System level placement. - Choose Sonday System 1 Placement Test to determine Sonday System 1 level placement for a student in 4th grade or above, or who scored above 85 on the Pre-Reading Survey.
- Click Sonday System 2 Pre- and Post-Tests to assess skills of students who have completed Sonday System 1 or to monitor the progress of a current Sonday System 2 student.
Note: Pre- and Post-Tests do not provide recommendations for Sonday System level placement. - Click Sonday System 2 Placement Test to determine Sonday System 2 level placement for a student who has completed Sonday System 1, passed the Entry Test in Sonday System 2, or correctly spelled 65 words of the spelling portion of the Sonday System 1 Pre-Test.
The Sonday System allows for flexibility when teaching the reading levels. The first levels may be easy, but don’t skip them—they focus on short vowels, which are difficult or confusing for learners who have reading delays yet are essential to the foundation for any beginning reader. It may be possible to complete the first levels quickly, but as the material becomes more difficult, it will be necessary to slow the pace. The Mastery Checks will help with pacing and the decision to move ahead.
The student should have:
- A computer or device (such as a phone or tablet) with a camera, microphone, and stable internet connection
- The same videoconferencing platform (e.g. Zoom) as the teacher
- A writing utensil, preferably a dark pen or marker
- Paper to write on, preferably the Sonday System Notebook
If you are using the digital kit, the Student Notebook page can be found in the Resources tab of your Sonday System 1 or 2 Kit. This page can be printed and distributed as necessary.
Make sure pop-up blockers are disabled for winsorlearning.com.
Make sure the Student Window is open and not minimized.
You can also use the Follow Feature instead of the Student Window for faster loading time.
There is no minimum or limit to how many students can be in a group. You can make a group of 1 student or a group of 100 students. However, students tend to have the most success in smaller groups, generally no more than 6.
Make sure the Student Window is separate. You can do this by clicking the green "Launch/Refresh Student Window" button during your Sonday System Session.
When you start screensharing in your sharing platform, select the option to only share the Student Window, not your entire screen.
Some software only allows users to share their entire screen. Unless your school or district has restrictions on which applications to use, we recommend using Zoom.
Data is collected in the Teacher Resource Book (TRB Kit) components of the online Sonday System and can be viewed anytime via the TRB Kit. If you find that the information there is not sufficient, or you need paper copies of that data, a PDF of the Teacher Resource Book can be found in the Resources tab of your Sonday 1 or Sonday 2 Kit.
This issue is usually caused by interactions between your browser or internet connection with the Sonday System program. Try the following:
1. Clear the cookies and cache in your web browser.
2. Check that your wi-fi signal is strong enough to support all of the applications.
3. Try a using a different browser.
4. Talk to your IT representative and see if there's any software on your computer, such as anti-virus or pop-up blocking software, that would prevent the Student Window from updating.
Because of the interaction required between students and teachers, recorded videos cannot be substituted for teaching live.
Perhaps your student can read the Sound Cards or spell the dictated sounds in 30 seconds, less than the 2 minutes allotted for those tasks. Some can. While some steps can be done in less than the allotted time, your student loses opportunities to practice and you lose opportunities to monitor practice if you cut the time for the whole lesson. Instead, increase the time spent spelling words and sentences or reading aloud. Instruction is more effective if it is done regularly and practiced intensively. Lessons are set up to practice each aspect of reading and spelling for a short period so your student can maintain focus on each activity. If your student is delayed in reading, you will want to close the gap as quickly as possible.
The timer is located at the top of your Slide Controller. It will automatically start as you advance through slides.
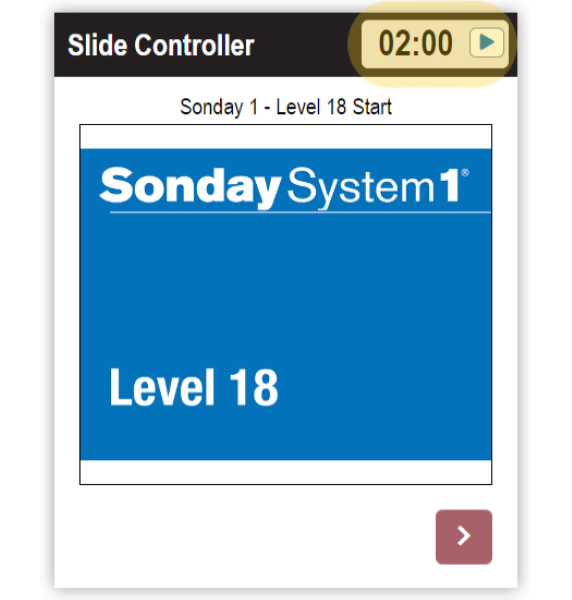
If you do not see the timer, activate it from your profile page by doing the following:
- Log into your account at www.WinsorLearning.com.
- Click My Profile from the menu at the left side of your screen.

- At the bottom of your profile, you will see Use Timer Feature in Teaching Tools? Click the toggle button next to Yes, then click the green Update button.
Before comprehension and fluency can be securely in place, students must be able to read words, phrases, and sentences. Precision teaching will do the job if multisensory, systematic, rule-based instruction includes a spelling component and an extensive review of all concepts taught. Teachers who expand their base of knowledge to include "learning to read" as well as "reading to learn" will not be curriculum dependent and can integrate any and all available materials into the master design.
We recommend grouping students according to the level they are on in Sonday System. Scheduling and individual needs can also be considered, but it is important that students in the same group be at the same or similar skill levels.
While there is no limit to how many students can be assigned to a group, we recommend groups of six or fewer students to maximize learning potential.
It is critical to look into the data of students' Teacher Resource Book (TRB) assessments and analyze student errors to determine which students have similar deficits and should be placed together. It may be helpful to group students by spelling level. The Sonday System Learning Plans are set up to review reading and spelling of sounds, words, and sentences based on the sounds and rules that have been introduced. A group that is organized by spelling level can work together comfortably through 20-30 minutes of a learning plan that includes Read Sounds, Spell Sounds, Read Words, Spell Words, and Introduce New Material. The last 10 minutes is for reading aloud. Students can be paired for oral reading; some can work independently at a reading task and some can remain in the instructional group so you can monitor.
While you cannot teach two groups simultaneously, you can add an unlimited number of students to a group.
- Don't call out the student who made the mistake. Keep the card displayed and say to everyone in the group, “Let’s trace.”
- When you say “Let’s trace,” do not say the sound and give your students the answer. Tell everyone to put two fingers on a surface, trace, and say the sound. If you do hear it pronounced correctly, you say, “Great, and trace it again.” Then trace it one more time.
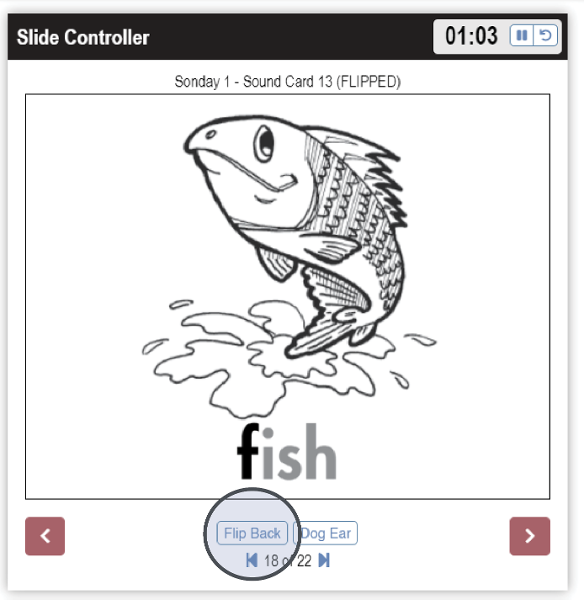
- If you don’t hear the correct sound, stop, reference the card in the Slide Controller, and say “F says /f/,” then click Flip to flip the card over.
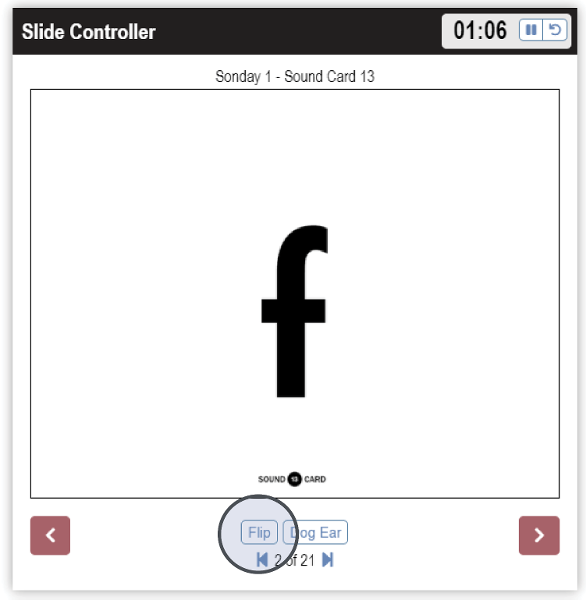
- Reference the keyword and picture and say, “/f/, as in fish." Then Click Flip Back to turn the card back over and say, “Everybody trace the /f/ sound again,” then have the students repeat it two more times.
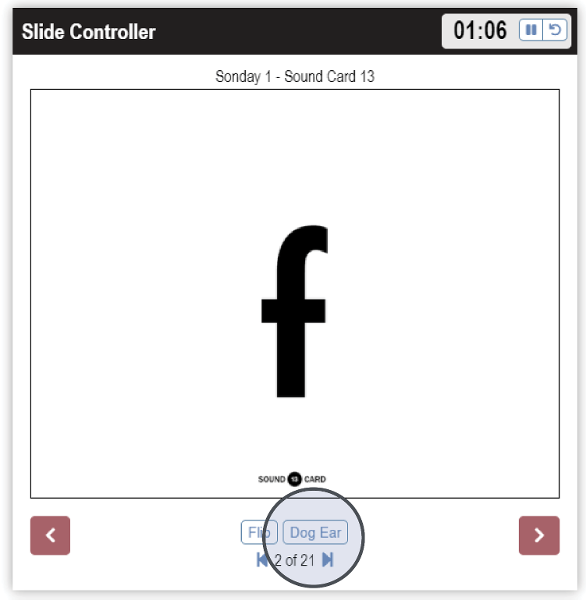
- Once a mistake has been properly corrected, click Dog Ear.
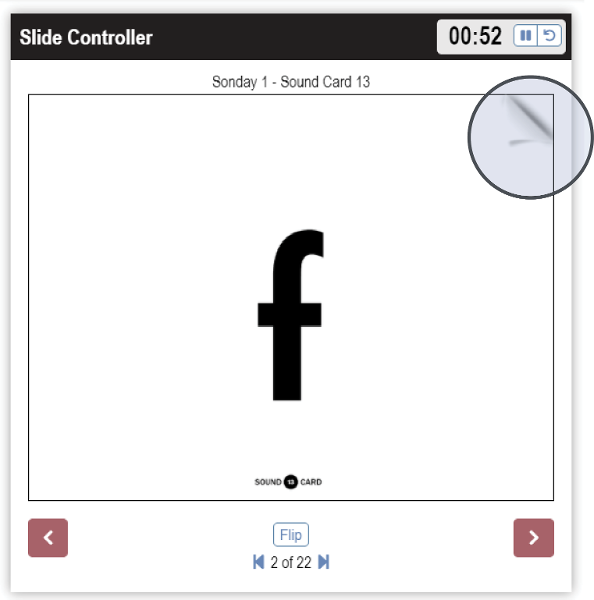
- The card will appear folded in the top right corner, and when you click the button, the card will be shuffled back into the deck. When the card reappears, Dog Ear it again so the students can practice the sound one more time. Repetition is key.
Sound Errors - Step 2
- During Step 2 - Spell Sounds, check the students' answers for each sound.
- As soon as you see an error, stop dictating sounds. Don’t say, “I see a mistake,” or call out the student who makes the error.
- Write the incorrect spelling on paper or a whiteboard and show it to your students. For example, if you asked for the spelling of the /er/ sound, but a student wrote "r," you would say, “I see an "r,", which makes the sound /r/. I wanted the /er/ sound.”
- Cross out the incorrect spelling (in this case, "r") and have everyone say the correct sound (in this example, /er/).
- If teaching multiple students, ask a student who got it correct what they wrote. If only teaching one student or no student got the sound correct, ask what makes the /er/ sound.
- Once the correct answer is given, cross out the incorrect spelling and write the correct one (in this example, "er").
- Tell the students that if they made a mistake, they should cross it out and write the correct spelling. Now all students should write and say the sound again two more times.
- During Step 4 - Spell Words, check the students' answers for each word.
- As soon as you see an error, stop dictating words. Don't say "I see a mistake," or call out the student who made the error.
- Write the incorrectly spelled word and display it to the students. For example, if a student wrote cloun instead of clown, say: "This is cloun."
- Ask the students to say the correct word. (In this example, clown.)
- Have the students Touch Spell the word.
- When you get to the sound that was written incorrectly, have your students stop and grab that finger. Ask them, “What sound did you hear?” Don’t give them the answer.
- Once a student says the correct sound (in this example, /ow/), ask what letter or letters make that sound. As soon as you get the right answer, write the correct word and show it to the students.
- Tell the students if they made a mistake, cross it out and write the correct spelling of the word (in this example, clown).
- Have everybody write and say it again two more times.
As a general guideline, one can continue to work on phonemic awareness on a daily basis throughout the entire year in order to reach mastery—and that’s okay.
For example, a student may struggle with rhyming for a long time, and we wouldn’t want rhyming by itself to prevent that student from learning to read. In that case, once the first 17 consonant sounds are relatively solid and secure, you can move on to Level 1, introduce the short vowel “a,” and start putting sounds together to begin reading and spelling. Short segments of time for rhyming practice can continue into the Reading Levels.
Start at the beginning of the Learning Plan every time you start a session. It is important to set students up for success from the level of sounds and words to the level of connected text. It is like a warm-up athletes do before competing! Nothing feels better than being able to give 30–50 correct answers at the beginning of a lesson. It sets the tone for the rest of the session. Watch the clock to make sure that you stay within the time parameters. If you cannot finish Read Sounds or Spell Sounds in 2 minutes or less, you may have introduced too many sounds and the student is not reaching the level of automaticity needed for fluent reading at the word and text levels.
The best way to solve this it to use the Screen Optimization Wizard, located on the right side of your screen after opening your Sonday System 1 or 2 Digital Kit.
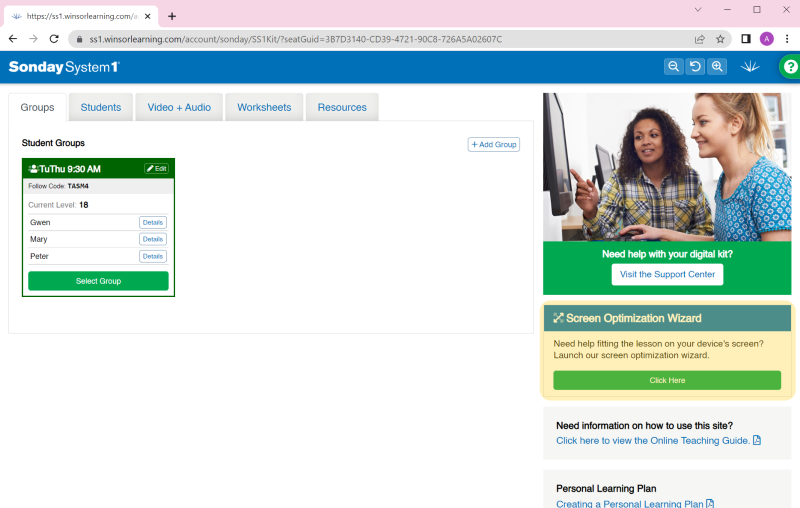
Clicking the minus will shrink down the size of your screen within your browser window, which will stop the screen's need to jump around.
The time it takes to complete a level depends on the student or group of students. It’s all about the stage of the students—not their age. Generally speaking, if a new sound, rule, or Sight Word is introduced one day, that sound or rule will become part of the following day’s review in Steps 1–4. Students will be getting multiple response opportunities in the following days and weeks in order to cement that new concept into long-term memory. A number of new sounds, rules, and Sight Words are introduced in Step 5. The time needed for students to master the new material in Step 5 will indicate the pace at which you can move through a level.
We recommend rearranging the windows on your screen so that the Lesson Plan with the Slide Controller is on one side, and the Student Window and video sharing platform (with your students) are on the other side. The windows can also be resized so your students take up a larger portion of the screen, and you can also keep an eye out on the Student Window to ensure it is updating correctly. If you are using the Follow Feature to share screens, you do not need the Student Window open.
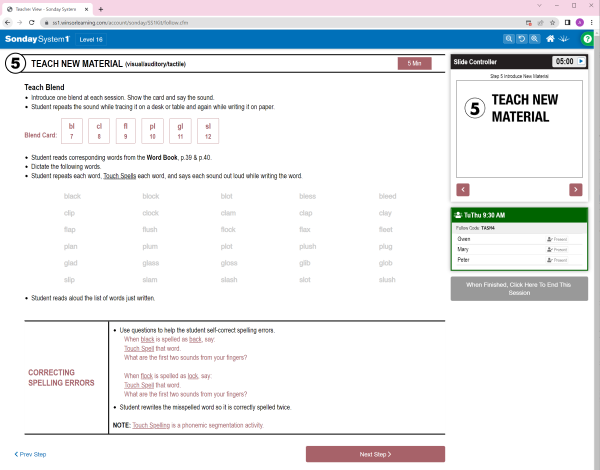
Step 5 displays more content than can be taught in one session. Words for sounds not yet introduced will appear in gray text. In the example shown (Level 16), one new Blend Card is to be introduced at each session.
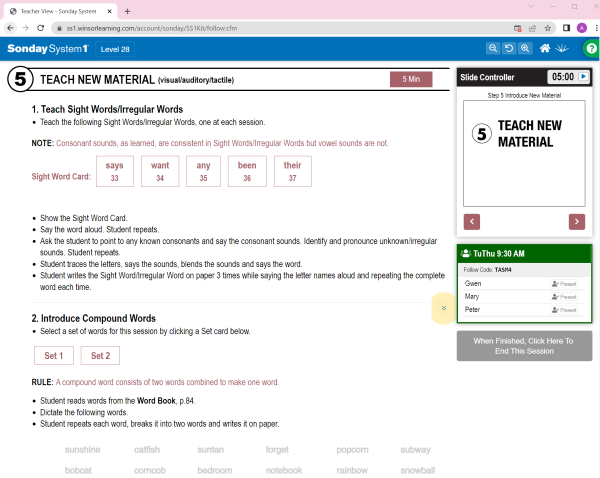
Note: Sonday System 2 Levels with Sight Words always begin with a complete set of all Sight Words for the specified level to help distinguish which Sight Words are known or unknown to the students. After reviewing the complete set of Sight Word Cards for that level, choose an unknown Sight Word to teach at this session.
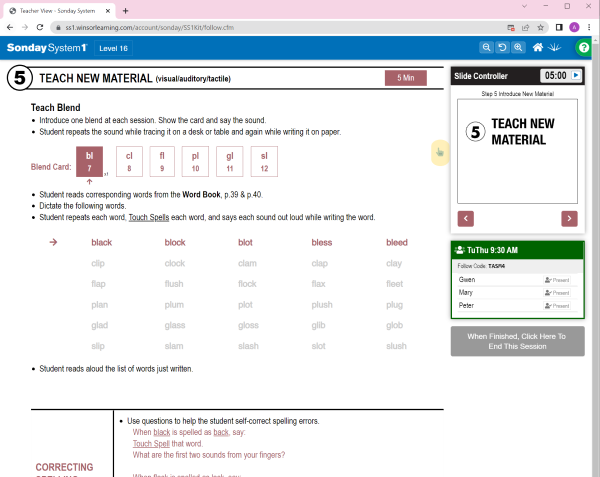
Click on the Blend Card you want to teach at this session. The chosen card and associated row of words will change to red, so you can see which items you have already taught when returning to teach this level at a later time.

Click in the Slide Controller to go through the slides, then follow the instructions for dictating words.
If time allows, you may teach multiple concepts within the same session by clicking to select another Sound Card, Blend Card, or Sight Word.

If needed, skip sections by clicking to jump to the next section of the lesson.
Ultimately, this should be the goal for every student. Work as fast as possible but as slowly as necessary in Sonday 1. The Mastery Checks for reading and spelling will be the best measure of pacing for instruction. The most important thing to remember is not to skip anything. Struggling learners have gaps in their understanding of language processing. If you skip anything or assume they know something that they don’t, they will continue to struggle to comprehend what they are reading because they will be stuck in the process of decoding. We want students to over-learn language concepts so that when they read, their minds can be free to think deeply about comprehension.
When you are showing the Sound Cards, students are dictating the speed and fluency. You can support increased automaticity by flipping the cards as quickly as they can be read. If students respond slowly and laboriously, you may have introduced too many sounds too quickly. In that case, remove some of the newer Sound Cards, go back a level or two, and allow your students more opportunities to practice and more time to learn. Then reintroduce the dropped sounds slowly, allowing plenty of time and practice so your students can maintain automaticity.
If the student is not able to read the 20-word Mastery Check for Reading, Form A, within the 30-second time frame, repeat the previous Level for 2 or 3 more sessions and then give Mastery Check, Form B. Do not tell the student that this is a timed test but monitor the timing for the 30 seconds. The Mastery Check is a tool to help the teacher determine whether or not the student is ready to move on. Moving ahead before the current skills are solid will likely mean going back to reteach material at a later date.
You may not get them to want to trace but you can get them to trace. Try one or more of the following:
Model: Every time you ask them to trace, be sure that your own hand is tracing on the table. Your participation may be encouraging.
Magic: Point out that their writing hand is a magic hand when they trace on the table: it unlocks the words for them and sends the message to their brains. Demonstrate this to them.
Logic: Explain the connection that is made when tracing letters/sounds. Tracing activates motor memory in the brain and helps connect the letters and sounds (graphemes and phonemes). Because we traced sounds when we were first learning them, we can access those sounds by tracing the letters we see and allowing the brain to unlock the sounds.
Be sure that you believe in the strategy and understand the reasoning behind it—the scientific explanation—so you can be convincing.
If you have the printed kit, worksheets are included in the Word Book. Digital copies are always available on your Media Kit flash drive, where they can be downloaded and printed as needed.
If you have the digital kit, worksheets are located in the Worksheets tab, which you will see after opening your Sonday System 1 or 2 digital kit.
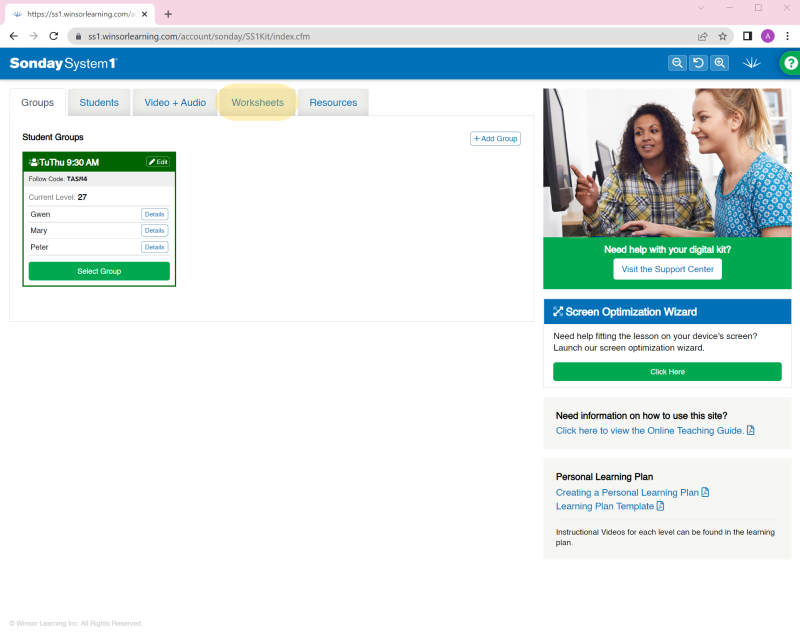
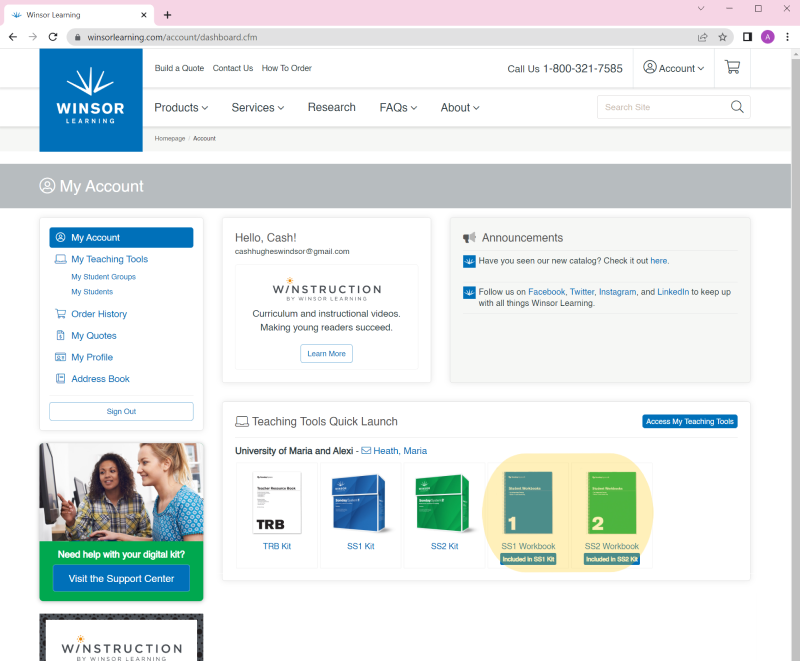
Additional worksheets can be found in the Workbook portion of your digital kit, which can be launched after logging into your Winsor account. If you do not see the Workbook on your dashboard, reach out to your district administrator to have the workbook assigned to you.
Mastery Checks are at the end of every third level starting at Level 3 (then 6, 9, 12, and so on).
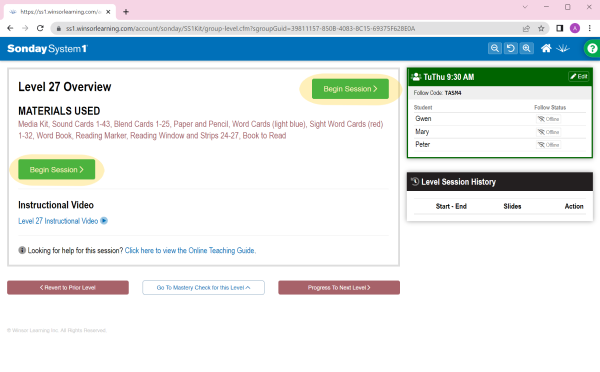
After clicking Go To Mastery Check for this Level , a prompt will appear asking if you are sure. Click OK.

Then click either of the green Begin Session buttons.
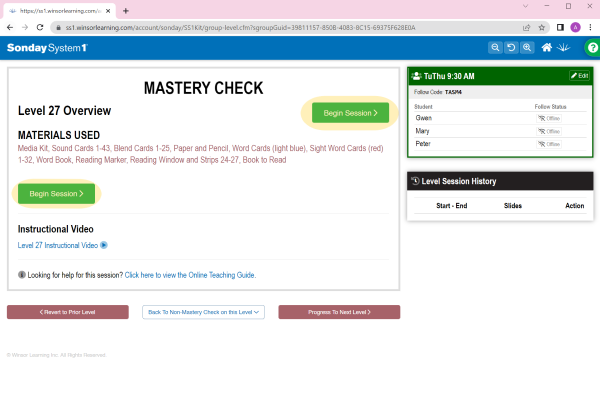
When teaching multiple students, we recommend administering the Mastery Check for Reading first, as this should be done individually with each student in a private video session. To start a new Mastery Check for a new student, you will need to end the current session and begin a new one. Mastery Checks for Spelling can be administered to all students in a group session.
To reteach the level, click on Back To Non-Mastery Check on this Level .
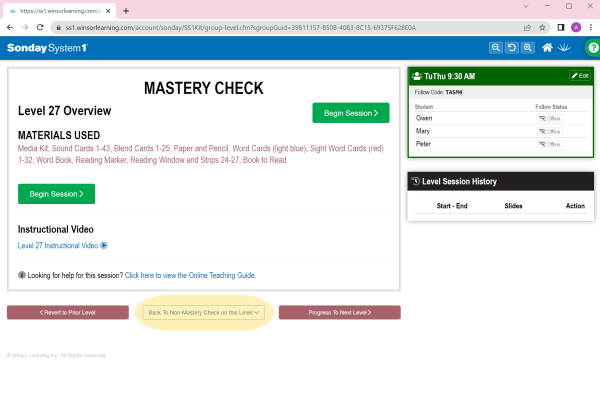
A prompt will appear asking if you are sure. Click OK.

Then click either Begin Session button to teach the level again without the Mastery Check.
Word Book pages are automatically generated with the appropriate content for the chosen level or selection, eliminating the need for a separate Word Book in the online version.
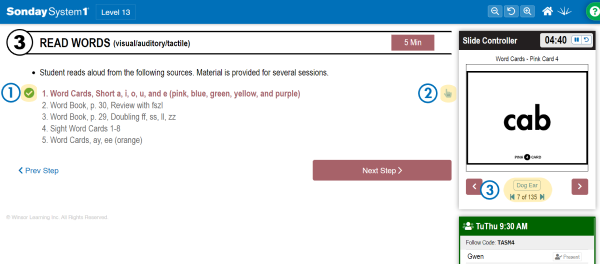
In Step 3, you need to select an item in your Teaching Window. The slides will not load until you make a selection.
- Choose one of the options by clicking it. The system will load the selected content in the Slide Controller. The system reminds you which option has been chosen by displaying a checkmark next to it. Click the Next button in the Slide Controller to advance through the selected slides.
- If time allows, you can make another selection by clicking the pointer icon .
- As in other steps, the system displays the number of slides in the set. As in Step 1, you can Dog Ear Word Cards and skip to the end of a set by clicking or to the beginning of a set by clicking .
If you hear an error:
- Simply stop and say, “Let’s trace.” Do not tell the students the word before they trace.
- Have students trace the letters while saying the sounds, then blend the sounds into a word while underlining the word with the same 2 fingers. Repeat this twice.
- If reading from a Word Card set, Dog Ear to place the card back into the deck for further practice.
Most teachers have their students write their words on paper and then show what they have written to the camera. Pens and markers will appear more clearly on screen than pencil. Other solutions can be considered, such as separate digital writing platforms or dry-erase boards.
The Board Game is not included in the digital version of Sonday System 1 Kit.
Sonday System 1 or 2 Digital Readers can be used by students for additional practice outside the classroom with the assistance of a guardian or other homework helper.
If the kit you purchased includes digital Readers for Sonday System 1 or Sonday System 2, this will be indicated with an icon placed over the appropriate Kit on your Quick Launch page.

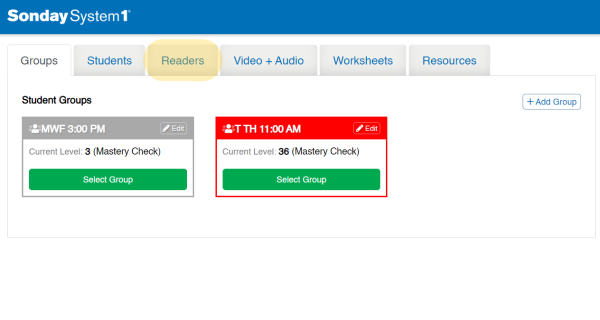
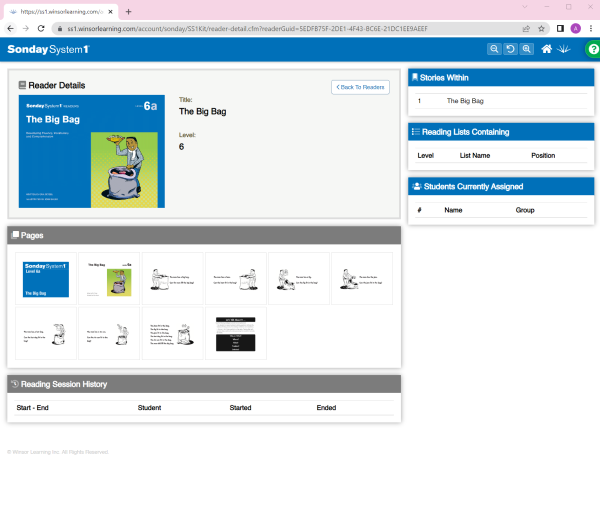
Once you launch your kit, you will see a “Readers” tab at the top of the page. Click that tab to see a listing of the included Readers by Level.
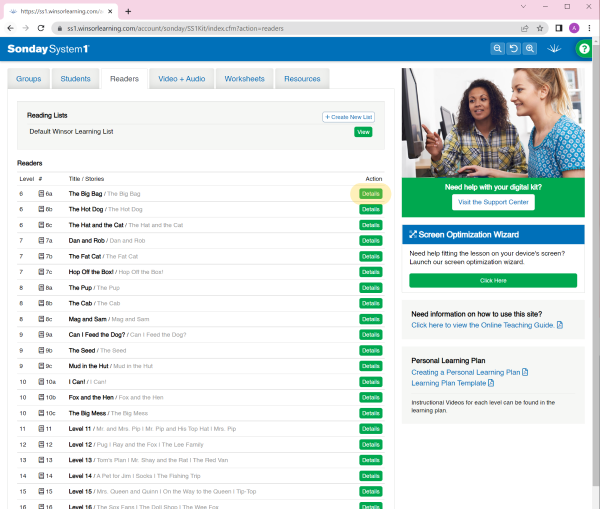
Click the green Details button at the far right of each listing to display an overview of the Reader.
On the Details page, you will see “Reading Session History,” a listing of times an individual student accessed a particular Reader, the amount of time they spent on it, and the page where they ended their most recent reading session.
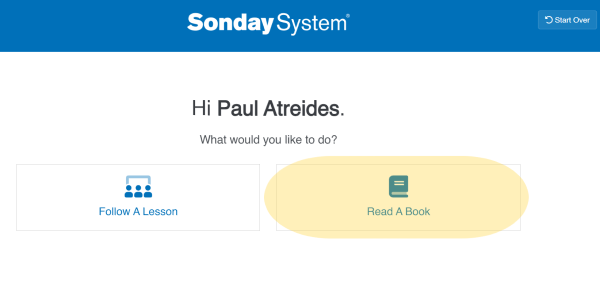
Students can access the readers for their current level by going to winsorlearning.com/follow, entering the group's Follow Code, and selecting the Read a Book option.
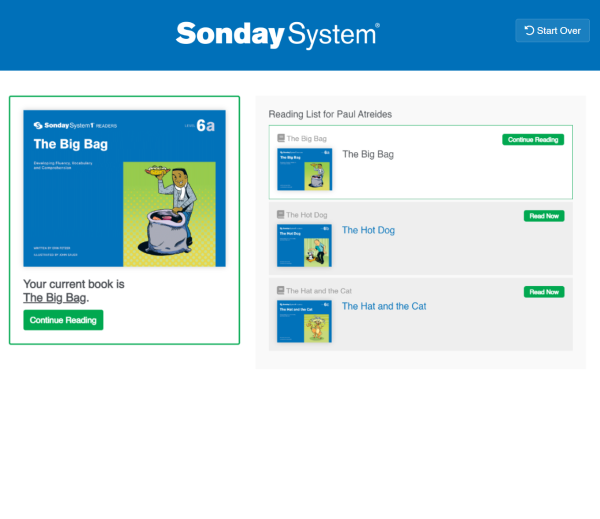
Currently, a teacher cannot directly assign a Reader to a particular student. Kits with Digital Readers automatically populate the Reader option on the Follow site for the Level the teacher has currently assigned to the group.
For example, if your group is currently on Level 6, the students in that group will automatically see Level 6 Readers when choosing the Read a Book option on the Follow site.
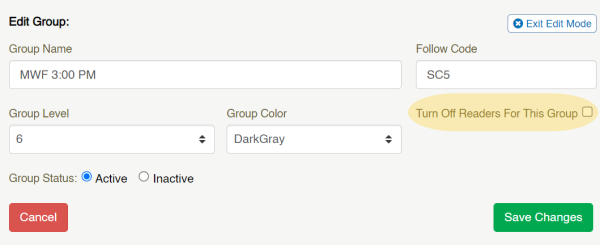
(If you do NOT wish your students to have access to the digital Readers, you can turn off their accessibility by going to Edit Group and checking the box next to “Turn Off Readers For This Group.”)
Your students access the Digital Readers for Sonday System 1 or Sonday System 2 via the Follow Feature. You must have created your unique Follow Code for the appropriate group in order for your students to access them.
A student then goes to www.winsorlearning.com/follow and inputs the Follow Code you have provided. After clicking on their name on the next screen, they will be presented with two options: Follow a Lesson or Read a Book. The student should click Read a Book to access the assigned digital Reader.

The student opens a Reader by clicking on any of the stories available.

The student navigates through the pages of the Reader by using the left and right arrows displayed on the edges of the screen.
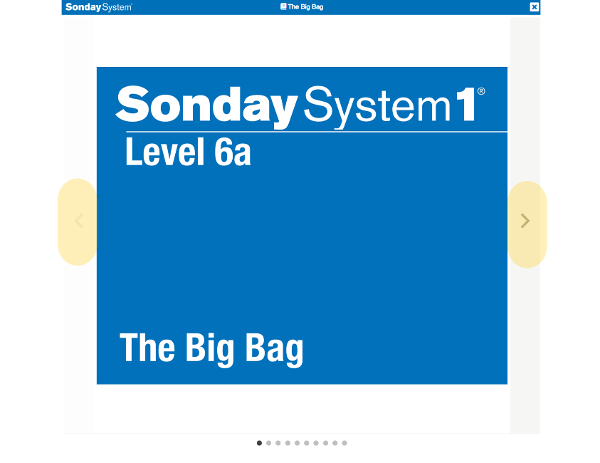
To exit a Reader, a student can click the x icon in the top right corner of their screen.
Currently, students accessing the digital Readers outside of the classroom should participate in this reading activity with the assistance of an adult homework helper.
You can complete an assessment in the TRB Kit over multiple sessions.
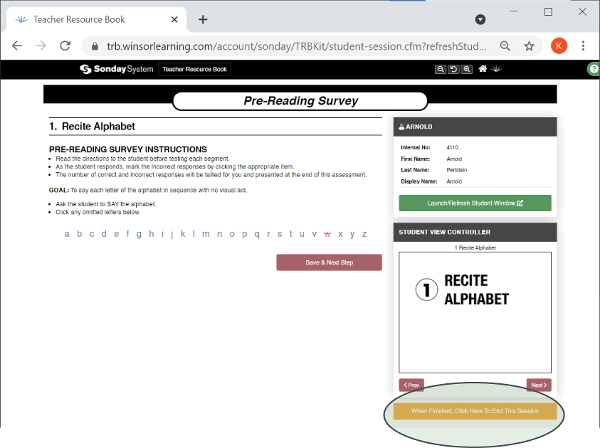
If you need to stop a test to complete at a later date, click the orange When Finished, Click Here To End This Session button to save your progress.
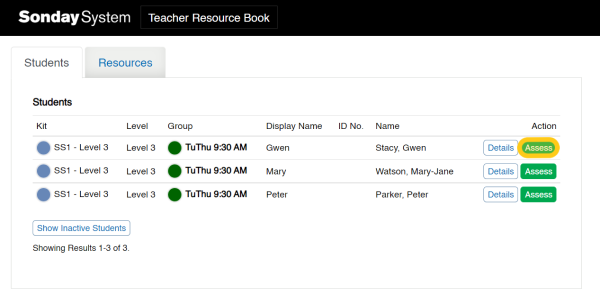
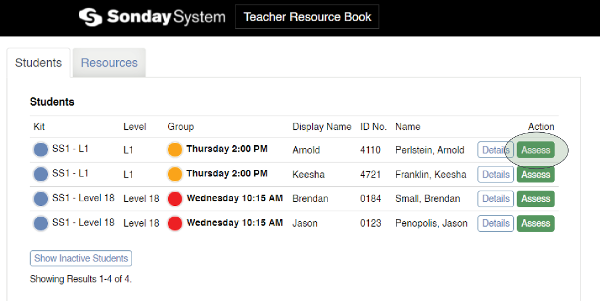
To return to the test, click the green Assess button next to the student's name from the TRB Kit home page.
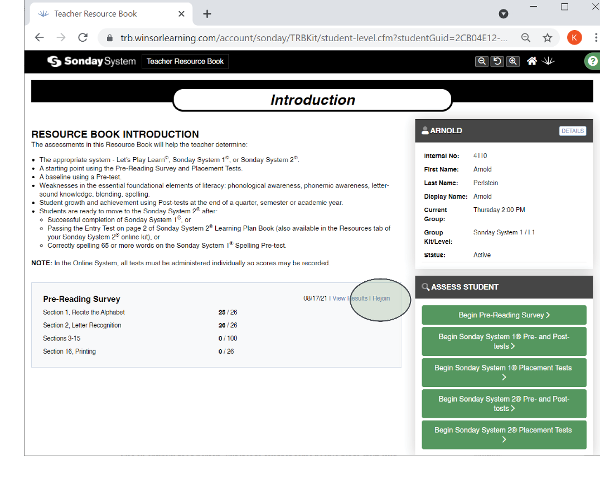
You will be taken back to the Introduction Page for that student. Click Rejoin in the top right corner of the test you wish to complete.
- Preschool-Grade 3 students or those who lack letter knowledge or sound awareness should begin at the Pre-Reading Survey to determine which assessment to complete next.
- If the student scores below 75, they should start with the appropriate level of Let's Play Learn.
- If the student scores between 75 and 85, they should start with Sonday System 1, Pre-Reading Levels 1-5. After completing these levels with the student, have the student take the Sonday System Pre- and Post-Test, then begin at Sonday System 1, Reading Level 1.
- If the student scores above 85, adminster the Sonday System 1 Pre- and Post-Test and the Sonday System 1 Placement Test. Begin the student at the recommended level.
- A student should take the Sonday System 2 Pre and Post-Test and the Sonday System 2 Placement Test if they have:
- Completed Sonday System 1,
- successfully passed the Entry Test in the Sonday System 2 Learning Plan,
- or correctly spelled 65 words on the Sonday System 1 Spelling Pre-Test.
- Start the student on the level recommended by the placement test.
Assessments cannot be deleted. You can start a new assessment, and the record will be saved in the student's profile.
Log into your account at winsorlearning.com.
Open your TRB Kit.
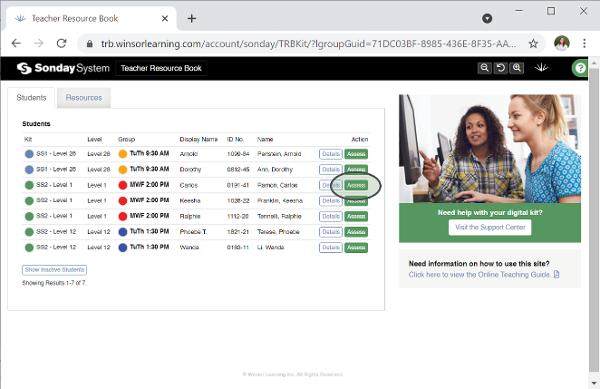
Click the green Assess button next to the name of the student whose results you want to view.
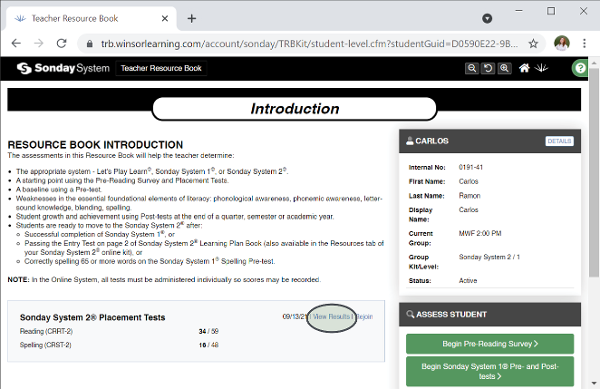
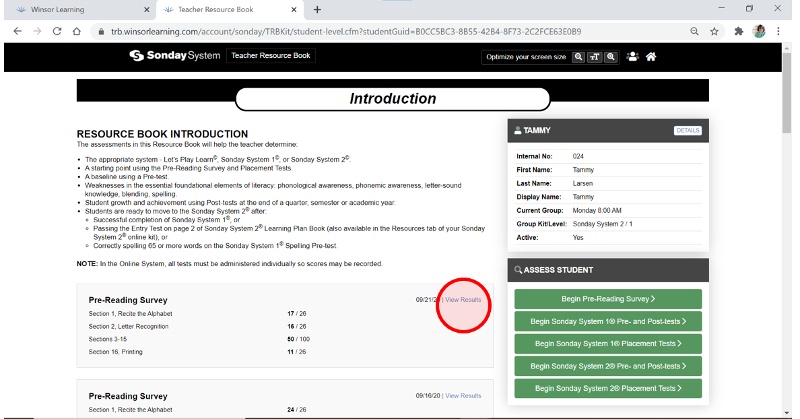
This will take you back to the TRB Introduction page. Click on View Results for the test answers you want to see in detail.
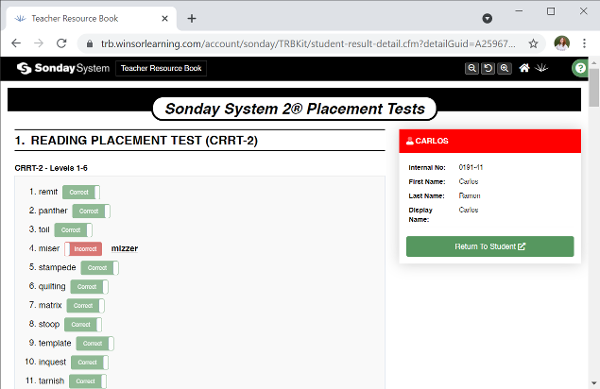
You can now view each item of the test and the student's recorded responses.
While you can complete a Sight Word Assessment using the available resources in the TRB Digital Kit, the test cannot be completed and recorded with the digital tools at this time.
To complete a Sight Word Assessment using the digital kit resources:
- Log in to your account at winsorlearning.com.
- Open your SS1 or SS2 Kit (depending on the Sight Word Assessment you wish to complete.
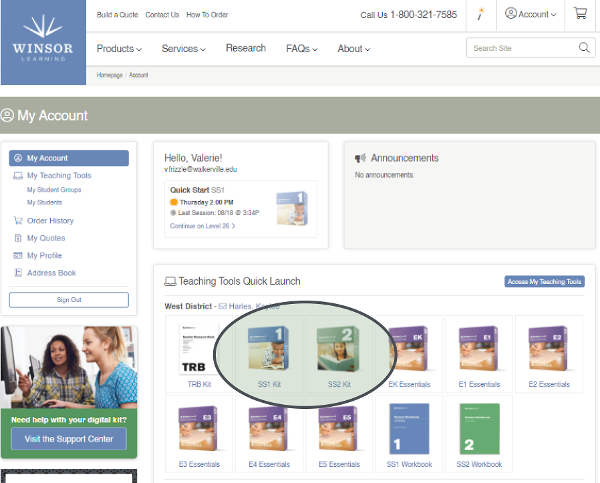
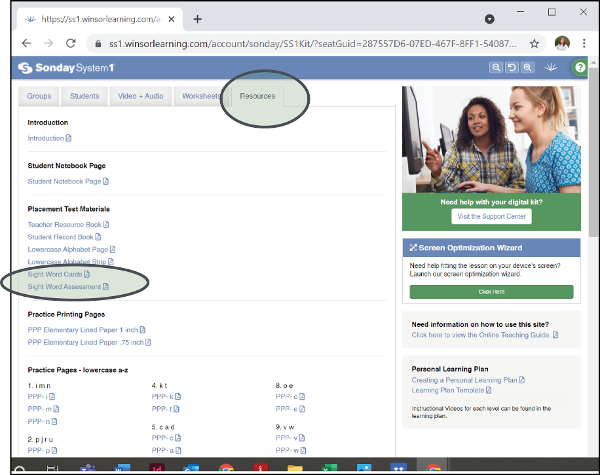
- Click on the Resources tab. Sight Word Assessment materials are under Placement Test Materials. (Screenshots below show file locations for both SS1 and SS2 Kits.)
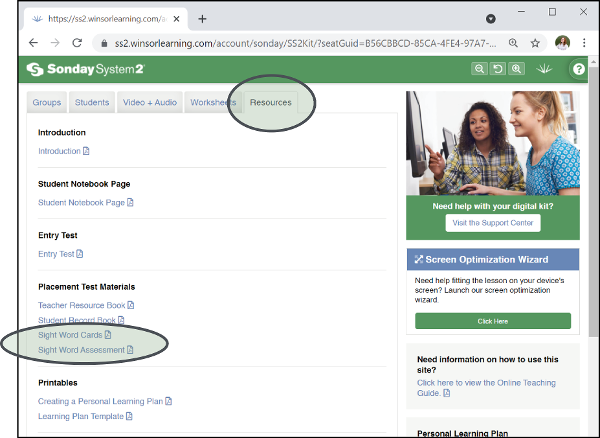
- Print out the Sight Word Assessment and follow the instructions. You can show the Sight Word cards to the student with the PDF by displaying it on a computer or device in the classroom, or you can print them out if you prefer. If you are completing the test remotely, share only the PDF of the Sight Word Cards with your student on your screensharing platform.
Instructions for each step will tell you how to mark incorrect answers for each section.
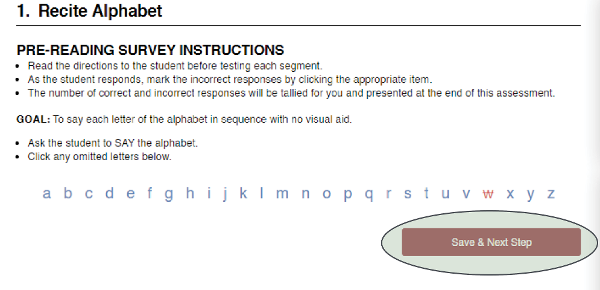
After clicking an incorrect item (the letter w in example below), the item will appear red with strike-through text. If you mark an error by mistake, clear the mark by simply clicking the item again before moving on to the next step.
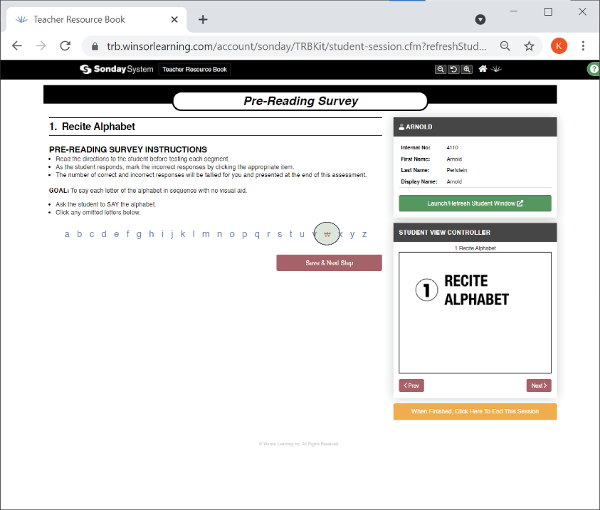
Always click Save & Next Step to move on to the next section of an assessment..
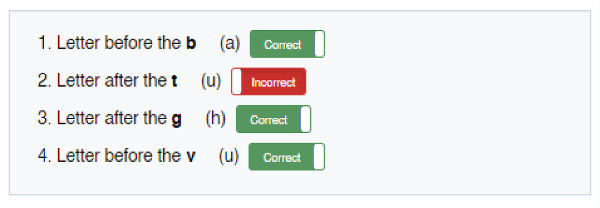
In other steps, you will mark incorrect items by clicking the green tab next to that item. The tab will change to red, and the text will read Incorrect once an item has been marked.
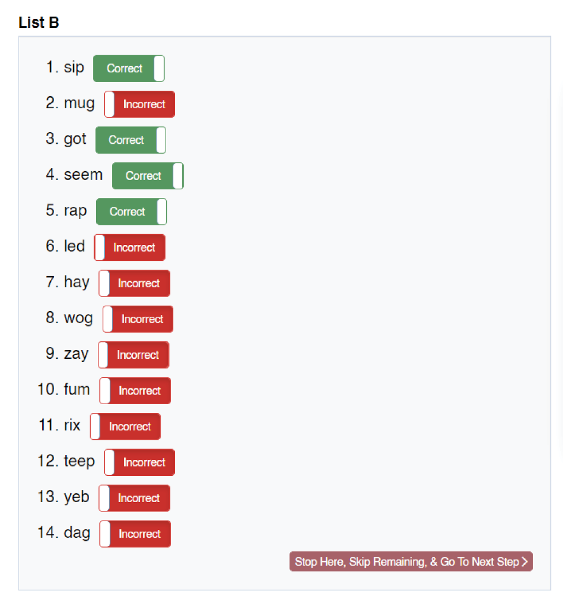
Follow the specific assessment instructions for skipping to the next section if a student misses a certain number of words in a row. It is especially important to pause the test and mark all subsequent items in that list as Incorrect before clicking Stop Here, Skip Remaining, and Go To Next Step.
In the example below, the student missed items 6–9. Because the instructions say to skip to the next portion if a student misses 4 words in a row, the test was then paused, and the remaining items were also marked.
Writing portions of an assessment will follow a similar format. Have the student display each word after it has been written so it can be marked properly as correct or incorrect.
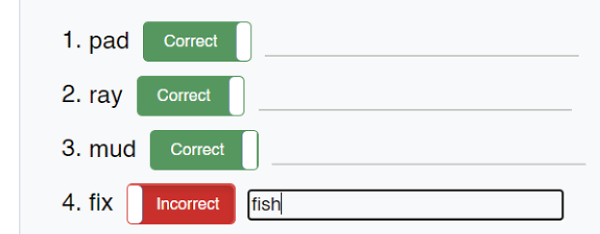
The Sonday System 1 and 2 Placement tests have an additional step for recording words that are incorrectly read. If a student reads a word incorrectly, click the blank field to fill in a student’s incorrect response. In the example below, the student read 4. fix incorrectly as fish, so the blank was filled accordingly.
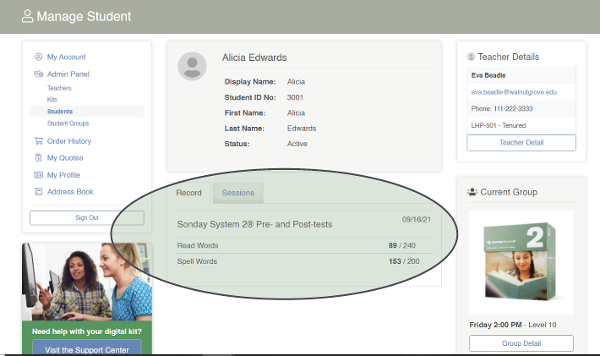
A student’s score will be automatically calculated as a test is administered, and the results will be displayed at the end of each assessment. Individual scores can be viewed under the Record tab of the student’s profile and when returning to the Introduction page of the TRB Kit for that student.
The Pre- and Post-Tests are designed to inform the instructor of a student’s current strengths and weaknesses in the skills taught for each Sonday System Kit. The Pre-Reading Survey and Sonday System 1 Placement Test are designed to provide a level recommendation based on the student’s results.
Once an assessment is completed, a record of it will be available on the TRB home page when returning to assess a student at a later time. Click on View Results to see a complete record of a student’s test.
Mastery is accuracy and automaticity. When skills are automatic and students have overlearned to the automatic level, working memory is free to focus on comprehension and learning new material.
Please do! Quite often, the needs of the students in your group are not identical. When you are finishing up with a skill, ask a more complex question to the students who possess the skill.
Use the Mastery Check document as a progress monitoring tool. When a student demonstrates consistent proficiency, document it on the list.
Feel free to use dates on the list, and/or note specifically what part of the skill is not mastered. For example, if a student chronically forgets a letter when saying the alphabet, date and mark it on the list.
Make your lessons more multisensory with many repetitions for added practice.
The Mastery Checks after every 10 levels can be used to identify where to begin a student.
There are no time limits. It is contingent on the needs of the students. A lesson can last 25 minutes or more.
Reteach! Redo the lessons with the skill deficits. You can spend more than one day on one level. Move on when a majority of your students have mastered the content in the Teacher Workstation.
We incorporate three modalities: see, hear, and feel for this type of instruction, so our lessons are quite lively!
If you are using LPL as an intervention, select 3 or 4 of the activities in the Whole Group Review, specifically those your students need more practice on. Complete the Teacher Workstation. Finish your lesson with 1 or 2 activities in the Student Workstation to collect data.
The Let’s Play Learn program is an early childhood program but is also successfully used as an intervention for struggling learners in early elementary grades. The program is heavy on phonological awareness and beginning phonics while also integrating practice in fluency, vocabulary development, and comprehension strategies. Some students will need more of these foundational skills due to the severity of their learning differences.
Due to its use of multisensory techniques and physical objects, the Let's Play Learn Program is only for in-person use.
Always have a visual present. Teachers and students together use language to explain the strokes you are making while tracing. End with the student saying the letter name. The Tactile Cards can help inform two-finger tracing.
There are a lot of skills when learning letters. For many who struggle, teaching the sound while introducing the letter is too much of a cognitive load. In LPL, we teach letter formation and names so students can identify and discriminate. The letter sound is taught in isolation after students have shown proficiency in the other skills.
Once a majority of your group has mastery of concepts taught in the Teacher Workstation, move on to the next level.
Teachers cannot assign their own proxies. The admininstrator for your kit needs to assign the proxy in the case of a substitute or other reason. The administrator can only assign a proxy to another person in the license group that has been assigned. Users can be added by administrators through their Admin Panel.
Only you can edit the information of your Teacher Profile. This is where you can control sharing features for your Sonday System Kit, change account settings, and more.
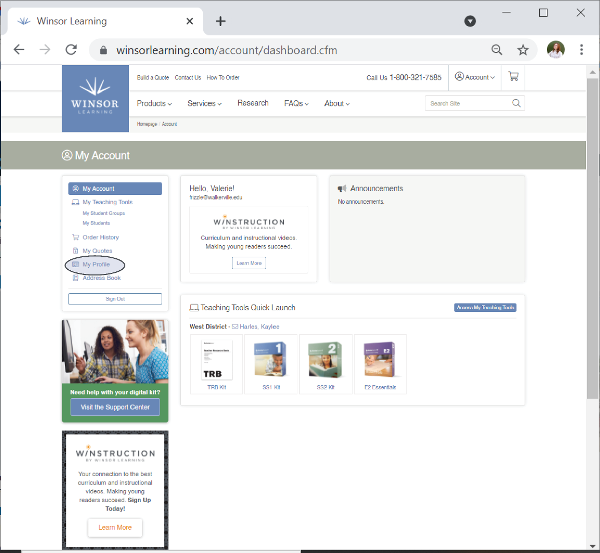
To edit your profile, log into your account at winsorlearning.com.
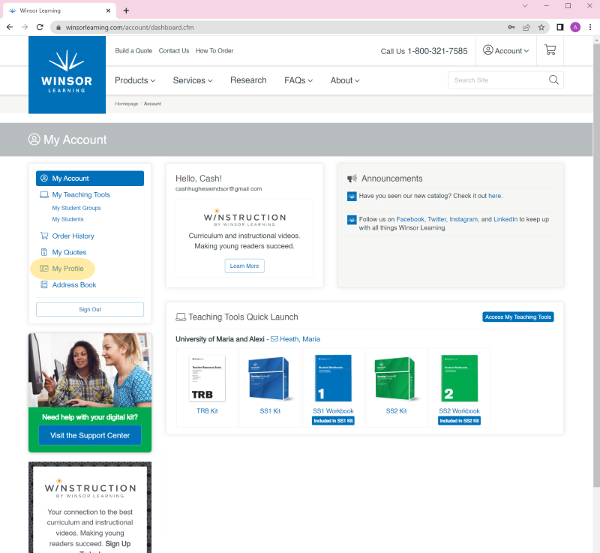
Click My Profile from the menu on the left side of your screen.
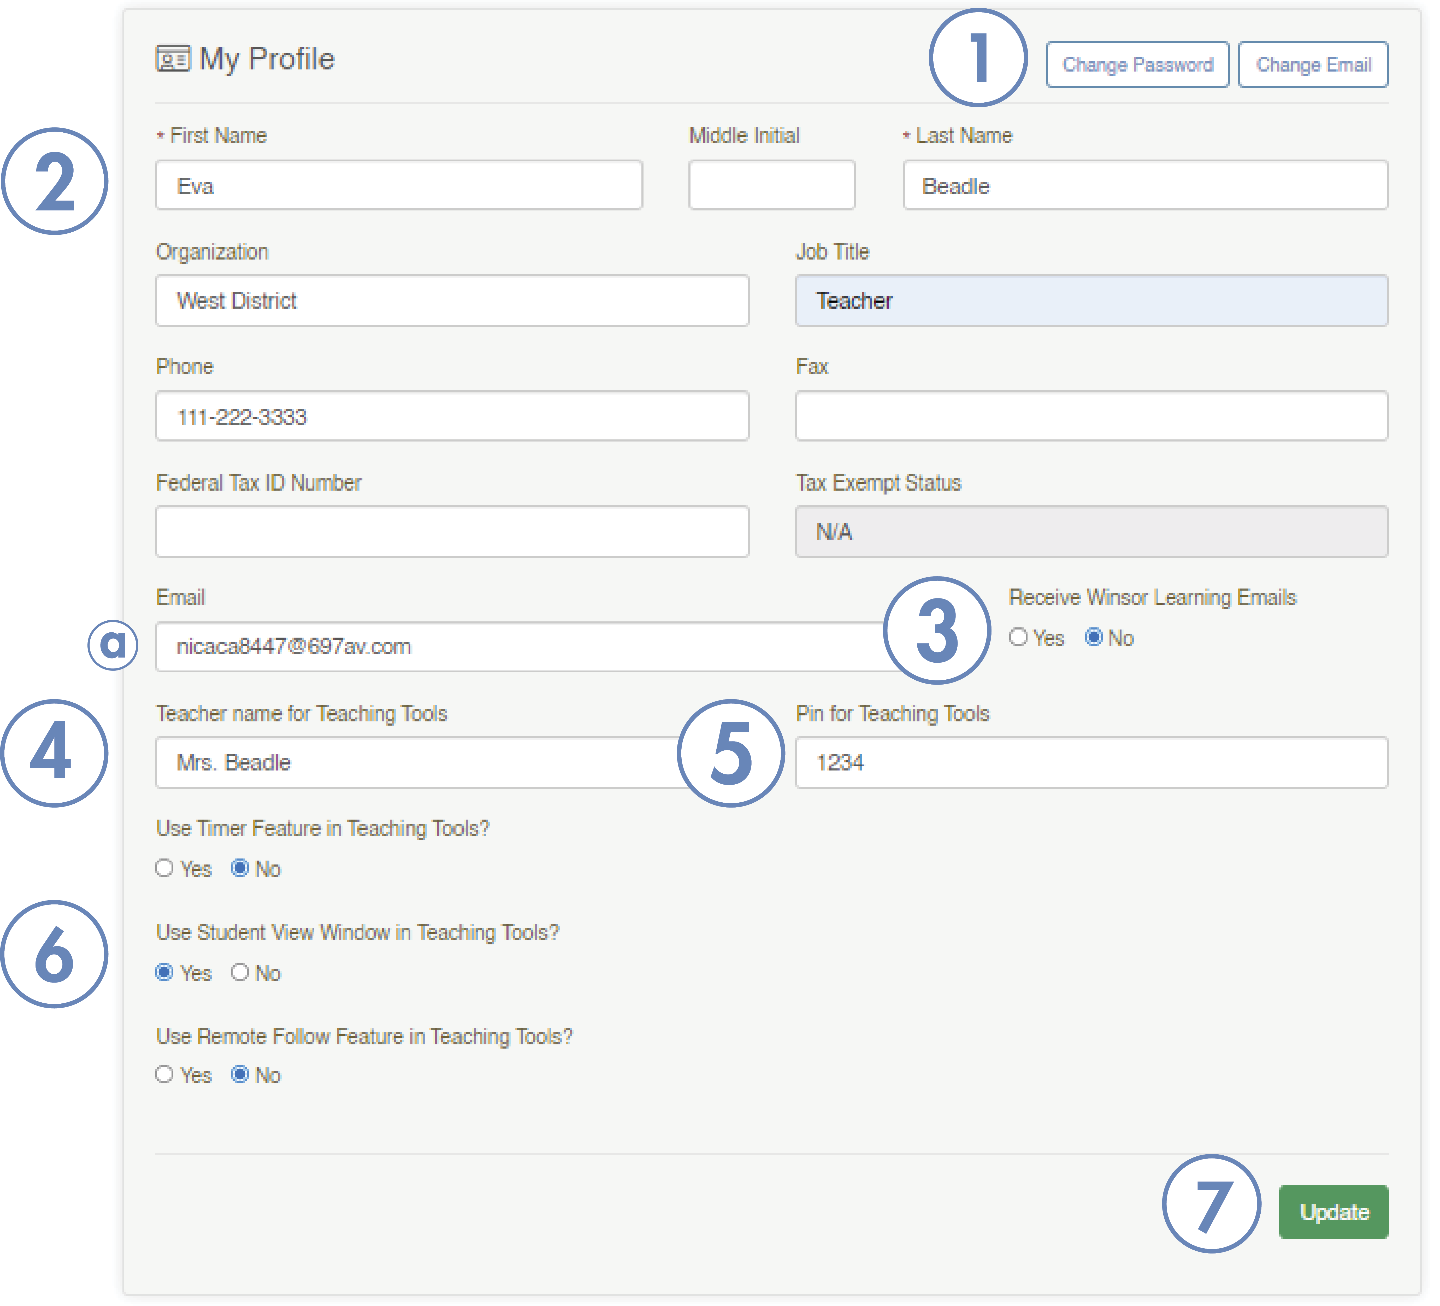
- Click Change Password or Change Email buttons to modify these account settings.
Note: Your email address must be changed here, not in the (a) Email field. - Contact Information: This data you enter is internal and can only be viewed by administrators.
- Receive Winsor Learning Emails: Click Yes or No to subscribe/unsubscribe to Winsor updates.
- Teacher Name for Teaching Tools: The name displayed to students during online sessions.
- PIN for Teaching Tools: Create a 4-6 digit numeric PIN for the Follow Feature. Only you will use this PIN. It can be accessed and changed at any time by returning to this page.
- Other Features:
Use Timer Feature in Teaching Tools? Turn Timer Feature on or off.
Use Student View Window in Teaching Tools? Turn Student View Window on or off.
Note: Turn the Student View Window off if you plan on using the Follow Feature exclusively for screen sharing in the classroom or when teaching remotely.
Use Remote Follow Feature in Teaching Tools? Turn Follow Feature on or off. This feature allows students to follow the learning plan slides remotely with faster loading times. See this article on the Follow Feature for more information. - Once you are finished modifying your profile, click the Update button to save the changes.
Log into your account at www.WinsorLearning.com.
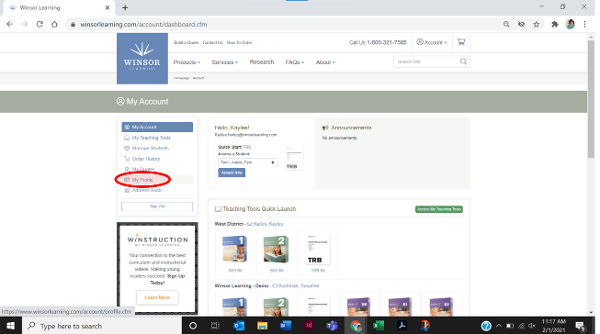
Click on My Profile from the account menu on the left side of your screen.
Click the Change Email button in the top right corner.
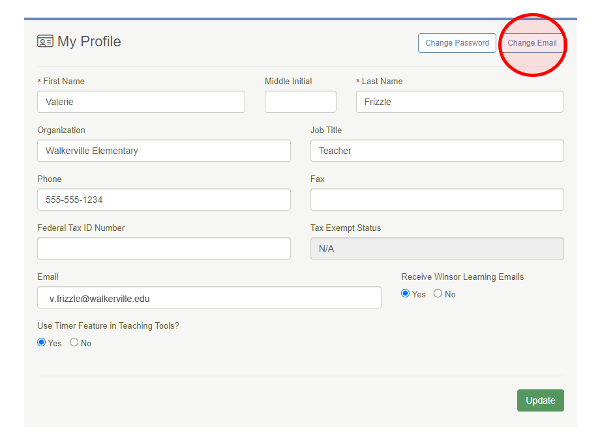
The Change Email option will now be visible under your profile. If you don't see it at first, scroll down.
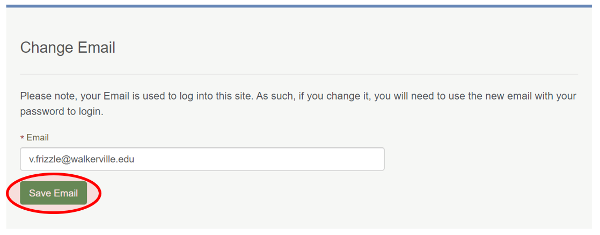
Enter your new email address and click the green Save Email button. An email will be sent to the address you entered. Follow the instructions in the email to log in with your new email address.
- Check your email for a Winsor Online Curriculum Tools Invite email from info@winsorlearning.com. If it is not in your inbox, check your Junk or Spam folders.
- Click on the Activate My Account now link. This will take you to this page with both the Invite Code and your Email filled out.
- Fill out the remaining required fields and verify you are not a robot.
- Click Activate Account to be activated and logged into your account.
Please email support@winsorlearning.com if you have lost access to the email account you used to log in to your Winsor account.
If you log out of your account, and log back in, your kit should appear. If you still do not see your assigned kit, please contact support@winsorlearning.com.
You can request a password reset email here.
If you have forgotten your password, you can request a password reset here.
If you have not forgotten your password but would like to change it:
- Log on to your account at www.WinsorLearning.com.
- Click on My Profile from the account menu on the left side of your screen.

- Click on the Change Password button in the top right corner.

- The Change Password option will now be visible under your profile. If you don't see it at first, scroll down.
- Enter your new password twice and click the green Save Password button.
Students using the Follow Feature in Sonday System 1 or 2 will see your display name when accessing winsorlearning.com/follow to view slides.
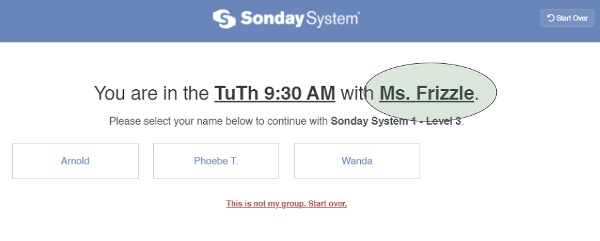
Your display name can be updated by editing your profile at any time.
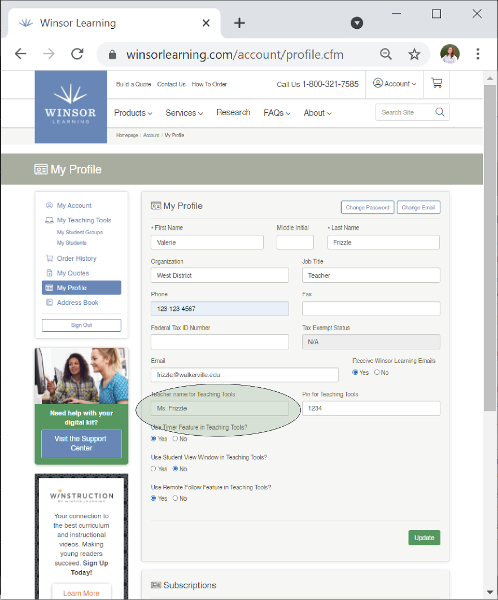
Setting a PIN is required for using the Follow Feature.
The PIN for Teaching Tools 4-6 digit code that you will use to access the teacher's view for the Follow Feature.
You can view and/or change your PIN at any time by editing your profile.
Because the skills spiral and are cumulatively reviewed, the teacher should start by targeting the errors in upcoming lessons. If the student doesn’t pass two consecutive mastery checks, this may be a signal that additional reinforcement or small group intervention is needed. Lessons can be repeated in small groups by the classroom teacher or interventionist at another time focusing on the errors made in the Mastery Checks, in addition to moving them along with the rest of the class on the whole group lessons.
Not at this time.
Yes, you can differentiate starting in Step 3, Read Words by using the Printables and having students reread words from previous lessons.
Essentials is meant to be taught in a classroom setting, which does not require the formation of groups.
The grouping function is for Sonday System use only, as it is designed for one-on-one or small-group lessons.
The Scope and Sequence can be found under the Scope & Sequence tab on the Essentials product page here. You can also review the Table of Contents in the front of the Learning Plan Book.
It is okay if Essentials doesn’t align with your Core Scope and Sequence. Essentials is a supplement to your core. It will provide the systematic, explicit, and cumulative instruction that students need to build their foundational skills in reading and spelling.
Yes, schwa is taught in the first lesson of Essentials 5. It is also covered in training.
It is optional to start 5th graders using the content from another level. Syllable types, syllable division, and spelling rules begin in Essentials 2 and are retaught in E3 and E4.
The hand motions are not specific, and you can use any hand motions you like. You can observe some common ones used by our trainers via our Winstruction online subscription platform. You can learn more about Winstruction here.
Essentials benefits students who are already proficient readers by teaching the predictable patterns within our English language so that they can read and spell. Quite often, above grade level readers do not have a comparable spelling ability because they have not learned the predictable patterns.
No, you can start at the beginning of the Learning Plan Book for each level.
It is necessary to change our instruction in reading and spelling to address the critical reading deficits of students in our schools. Nationwide, only 35% to 40% of students are proficient in literacy. Essentials will enhance and support the progress of the proficient students.
It is not necessary to go through all the words. Stick to the time limits. All material will be cumulatively reviewed in upcoming lessons.
All materials are for single-classroom use only. Schools and public institutions may charge their orders with authorized purchase orders. Terms are 30 days from the invoice date and are subject to a late charge for past-due balances. Individuals must prepay orders by credit card or check.
You can contact Winsor learning at the following address:
Winsor Learning Inc.
3001 Metro Drive, Suite 480
Bloomington, MN 55425
International orders can only place a quote on the Winsor Learning website. Once the quote is placed, someone at Winsor will update your quote with the correct shipping information and approve the quote. You will receive an email when this has been completed, and you can log back in to the website to place your order with a credit card.
Email:
ar@imginelearning.com
Fax:
1-651-222-3969
Mail:
Winsor Learning Inc.
3001 Metro Dr. Ste 480
Bloomington, MN 5542
If your school or business needs a W-9 form from Winsor Learning Inc., you can download a completed copy here.
Orders in the U.S. have a shipping and handling cost of 10% of the order total ($8.00 minimum). Please call regarding international orders, or place your orders as a quote and we will set the shipping information before sending the quote back for your approval. Express delivery is also available, at an increased rate, upon request—please call: 1-800-321-7585.
You can add products to your cart while navigating the site. From your shopping cart, you can either place your order or submit it as a quote. You can checkout as a guest or create an account to access order history. If you would like to submit a quote and know which items you would like, you can use the Build A Quote feature (link located at the top of every page).
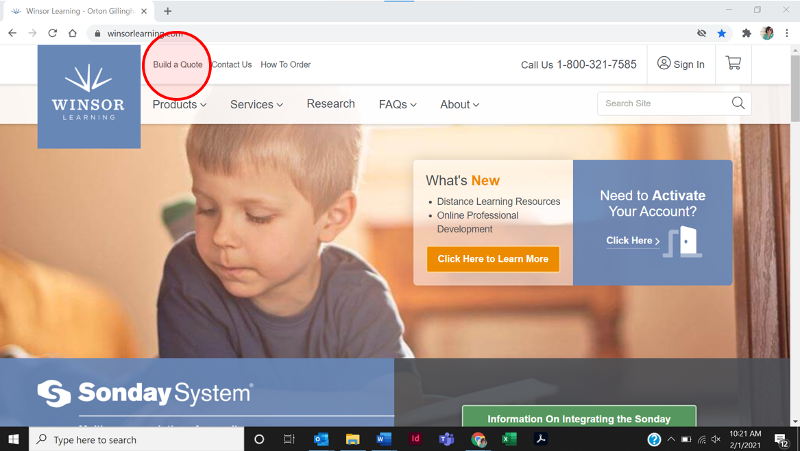
You can contact Winsor Learning at 1-800-321-7585.
You can fax Winsor Learning at 1-651-222-3969.
As a primary administrator, you can do the following with your online Winsor account:
- Create teacher profiles
- Assign kits, including proxies or substitutes
- Create announcements for users of Winsor products
- Manage ordering and license renewals
- Monitor student activity for Sonday Systems 1 and 2
- Access and use assigned digital kits
- Add and remove other administrators
Administators can not:
- Create or edit student profiles or student groups
- Change information on a teacher's profile once it has been created
Log into your admin account at winsorlearning.com.
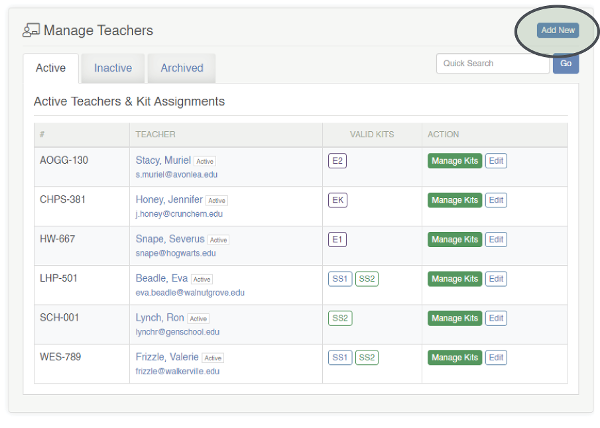
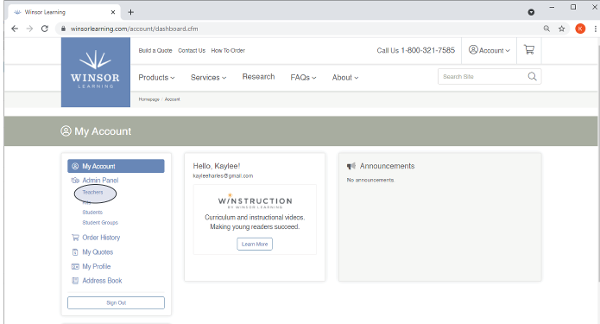
To add a Teacher's Profile, click Teachers under Admin Panel from the menu on the left side of your screen.
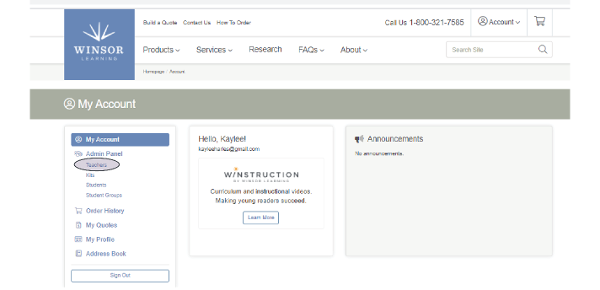
Click the blue Add New button.
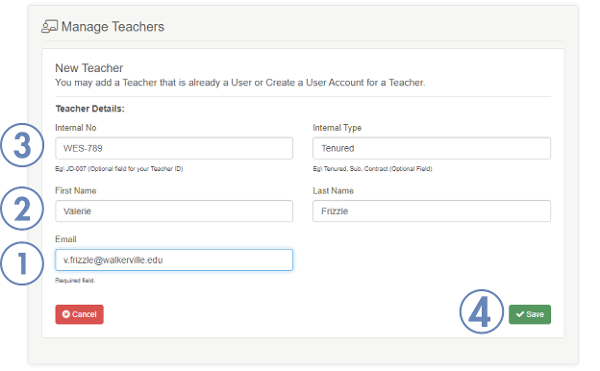
- When creating a teacher profile, Email is the only required field. Announcements and emails regarding account or kit status will be sent to the address entered here.
- While the First Name and Last Name fields are optional, keep in mind that you will not be able to edit names or email addresses once a profile has been saved. The teacher can edit their name and/or email address from their Winsor account.
- The Internal Number and Internal Type fields are optional and can be changed at any time.
- Click the green Save button to add the Teacher profile. An email with activation instructions will be sent to the address provided.
The teacher's status will be listed as Pending until their Winsor Account is activated.
Log into your admin account at www.WinsorLearning.com.
Click on Teachers under Admin Panel from the menu on the left side of your screen.
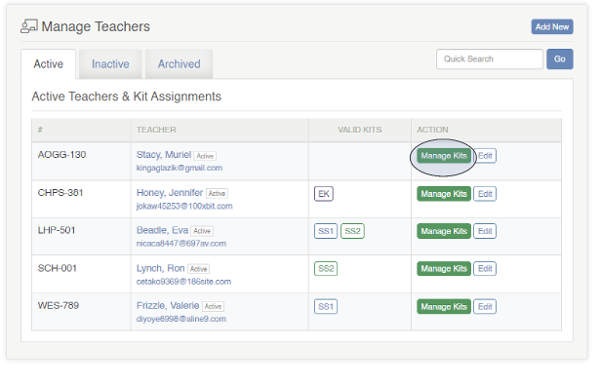
Click Manage Kits next to the name of the teacher you wish to assign a kit to.
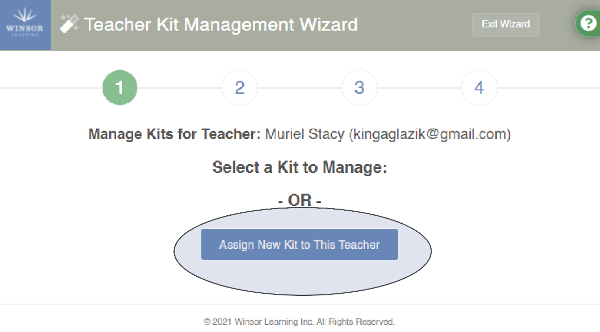
This will take you to the Teacher Kit Management Wizard. Click Assign New Kit to This Teacher to begin.
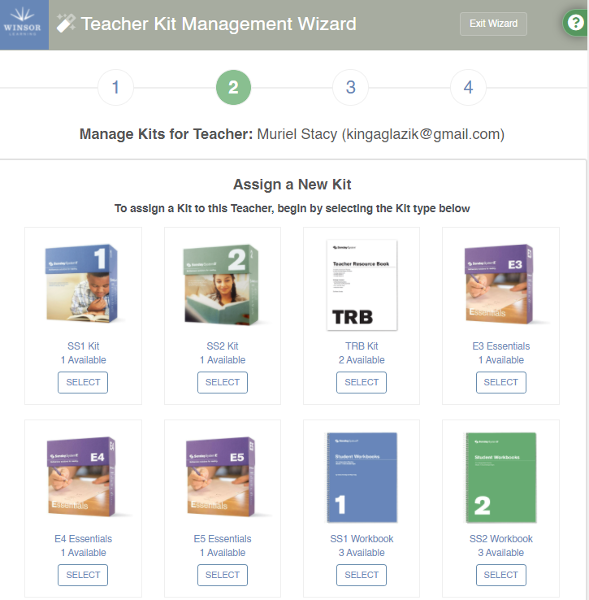
Click the kit you wish to assign.
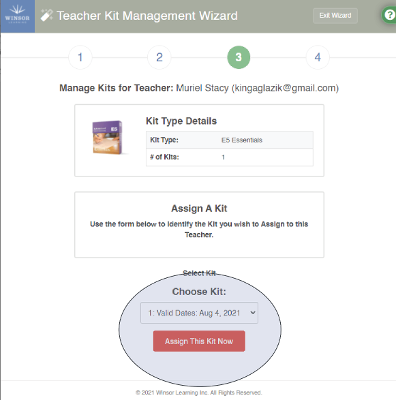
Select the kit by Valid Dates from the dropdown menu. Click Assign this Kit Now.
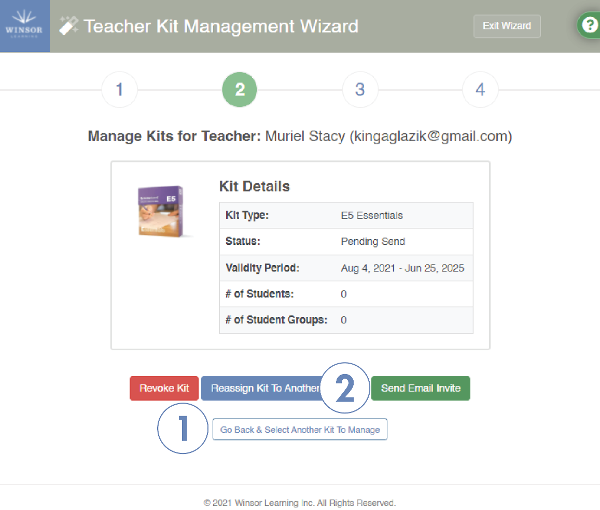
If you are assigning multiple kits to this teacher, click 1. Go Back & Select Another Kit to Manage. When you have finished selecting the kit(s), click 2. Send Email Invite.
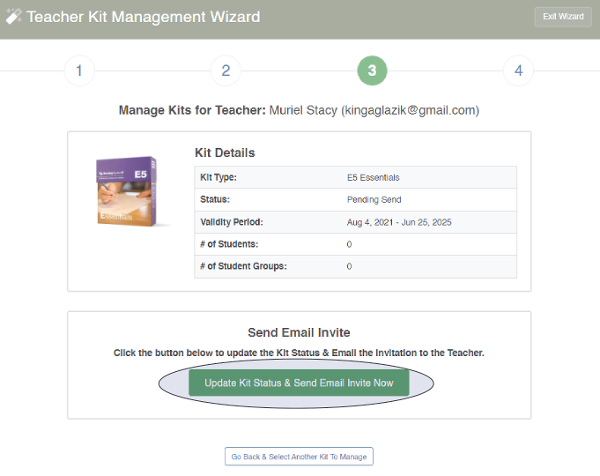
At the next window, click Update Kit Status & Send Email Invite Now.
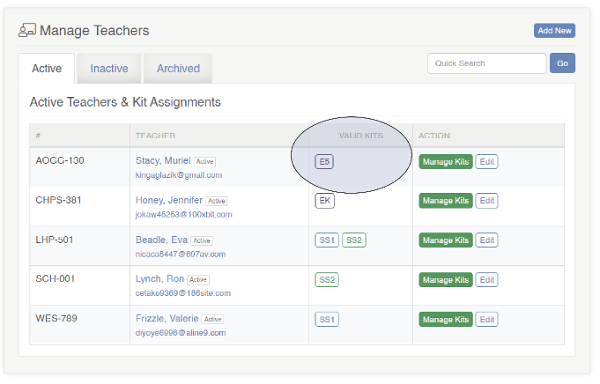
The assigned kit(s) will now appear in the teacher's Valid Kits under Active Teachers & Kit Assignments.
Log into your admin account at www.WinsorLearning.com.
Click on Teachers under Admin Panel from the menu on the left side of your screen.

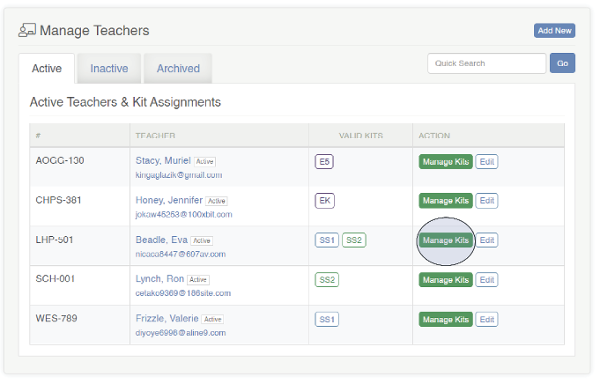
Click the green Manage Kits button next to the Teacher whose kit you want to reassign.
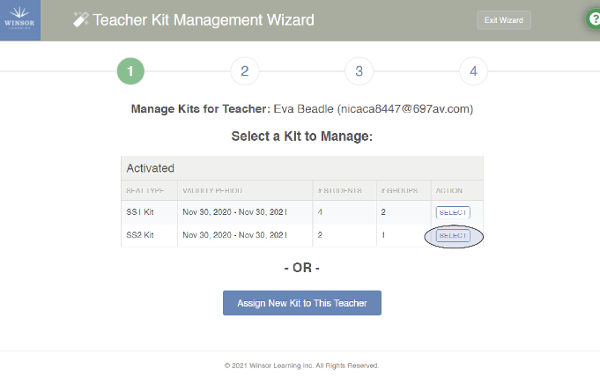
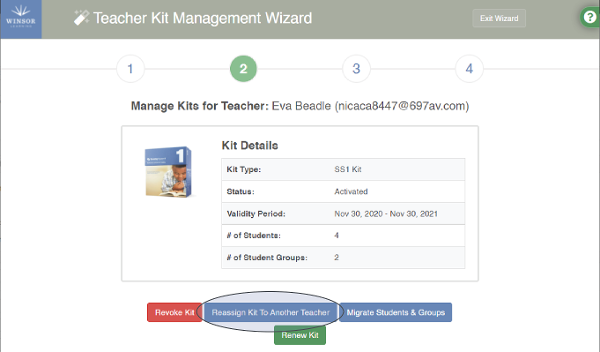
This will open the Teacher Kit Mangement Wizard. Click SELECT next to the Kit you are reassigning.
To reassign a Kit, click Reassign Kit to Another Teacher.
The next screen shows two options:
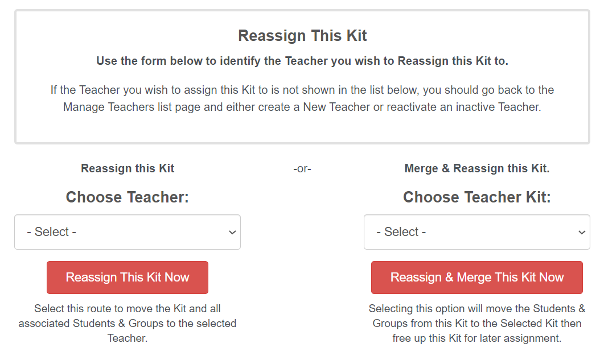
Choose Teacher Kit: Reassign the Students & Student Groups to another Kit, freeing up this Kit to be reassigned. Ideal for merging two Student Groups to be taught on the same schedule.
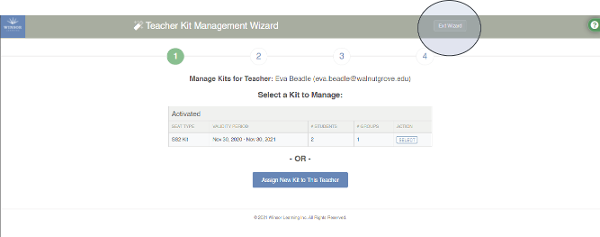
Click Exit Wizard in the top right corner of your screen at any time to return to the Manage Teachers panel.
Log into your admin account at www.WinsorLearning.com.
Click on Teachers under Admin Panel from the menu on the left side of your screen.

Click the green Manage Kits button next to the Teacher whose kit you want to revoke.

Click SELECT next to the Kit you are revoking.

To revoke a Kit without reassigning it, click the red Revoke Kit button next to the kit in the Teacher Kit Management Wizard.
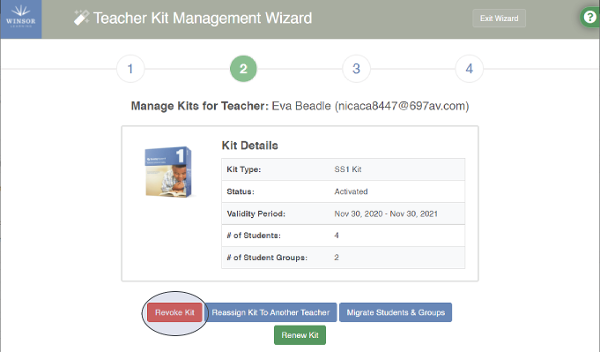
At the next screen, select Revoke This Kit & Disassociate Students & Groups Now.
Note: Revoking a kit without reassigning it means that all Students and Student Groups currently associated with the Kit will become disassociated with it and designated as Unassigned. They will need to be reassigned to another Kit at a later time. If you wish to keep the Students and Student Groups associated with this Kit, use the Reassign option instead.
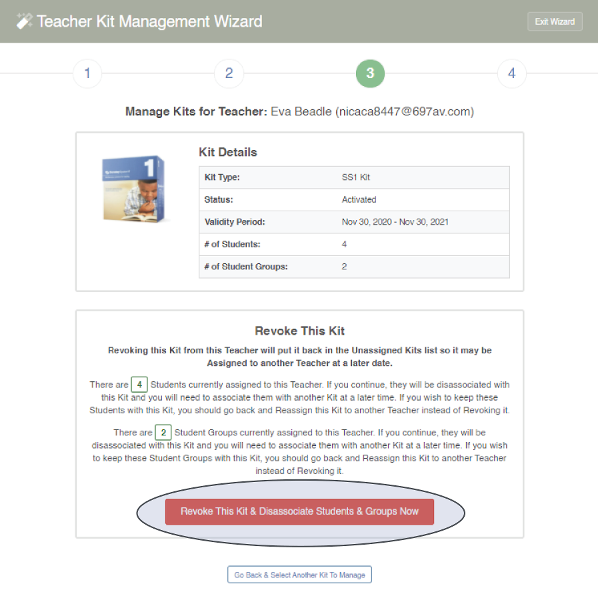
Your screen will return to Step 1 of the Teacher Kit Management Wizard.
Click Exit Wizard in the top right corner of your screen at any time to return to the Manage Teachers panel.

Log into your admin account at www.WinsorLearning.com.
Click on Teachers under Admin Panel from the menu on the left side of your screen.

Click the green Manage Kits button next to the Teacher whose kit assignment you want to change.

Click SELECT next to the Kit you are modifying.

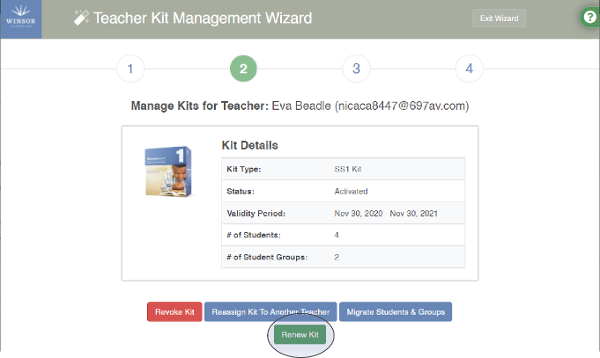
The next screen will display two options:
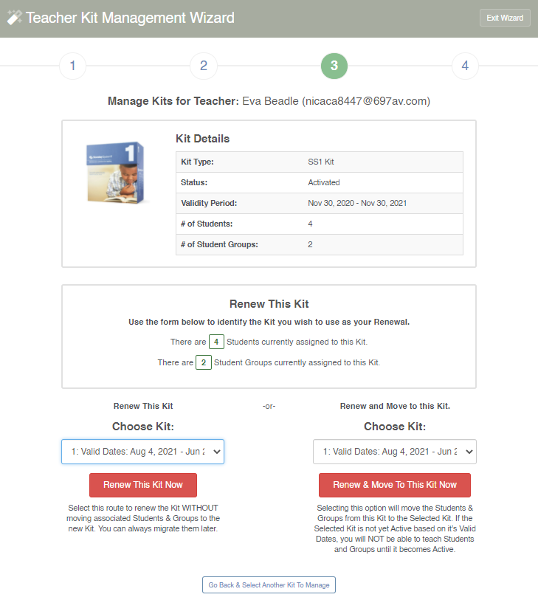
Renew & Move to This Kit Now: This option will renew the kit and move all Students and Student Groups to the new kit. Ideal for when the current kit's license has already expired.
Click Exit Wizard in the top right corner of your screen at any time to return to the Manage Teachers panel.

The announcement tool allows you to post news and information for teachers and also allows the team at Winsor Learning to post key announcements that have relevance to all users.
To create an announcement for your own team:
Log into your admin account at winsorlearning.com.
Click on Admin Panel under My Account on the left side of your screen.
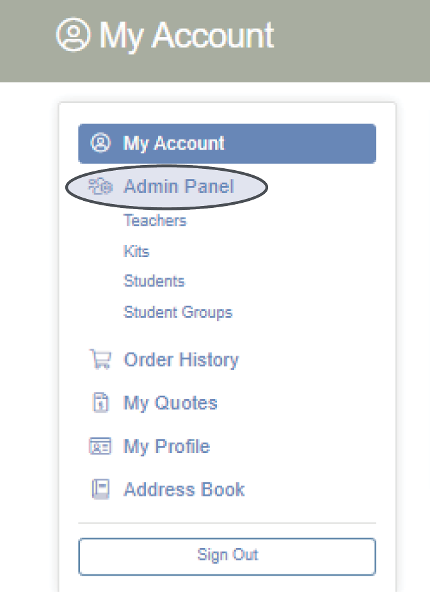
Click Manage Announcements.
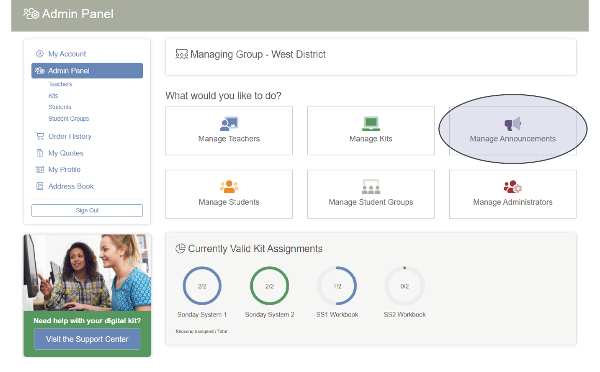
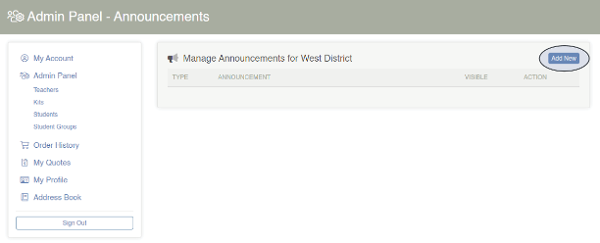
Click Add New to create a new Announcement.
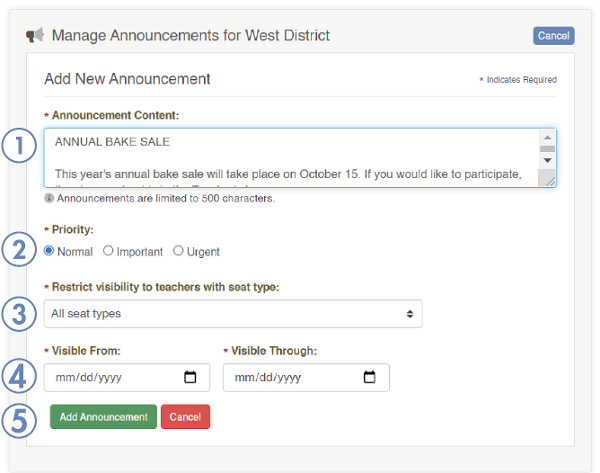
- Announcement Content: Enter up to 500 characters of text.
- Priority: Set the priority for your message as Normal, Important, or Urgent.
- Seat Type: Choose to send the announcement to all users or only users of a specific kit.
- Visibility Dates: Choose the dates that the message will remain active. After the specified end date, the announcement will no longer appear on users’ dashboards.
Note: Users are not sent email notifications for announcements. - Click Add Announcement. The announcement will be visible to selected users when they log into their Winsor account during the chosen Visible Date Range.
Messages with Normal Priority will have no icon under the TYPE column.
Important Messages will display a yellow under the TYPE column.
Urgent Messages will display a red under the TYPE column.
Log into your admin account at winsorlearning.com.
Click on Admin Panel under My Account on the left side of your screen.

Click Manage Announcements.

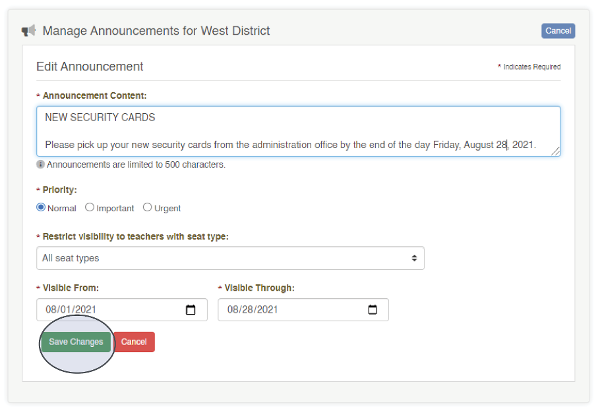
Click Edit next to the annoucement you wish to modify.

Make the desired changes to the announcement body, priority, and/or visibility options. Then click the green Save Changes button.
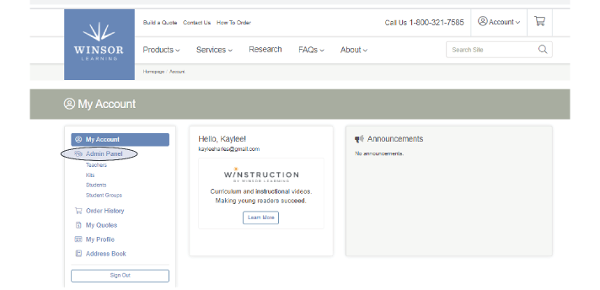
Click Admin Panel under My Account from the menu on the left side of your screen.
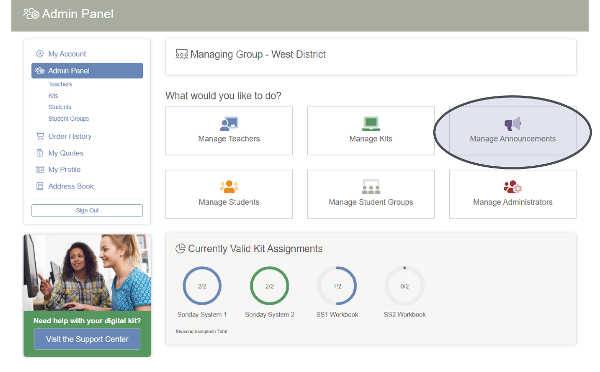
Click Manage Announcements.
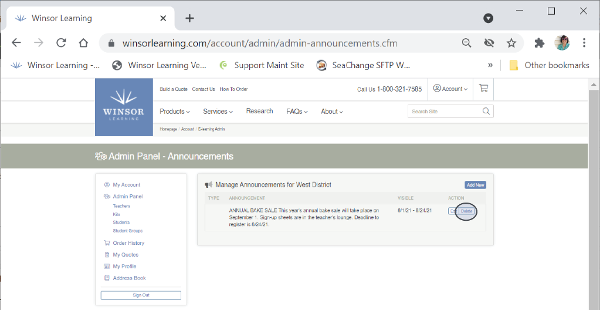
Click Delete next to the announcement you wish to remove.
A prompt will appear asking if you are sure. Click OK.

To view a Teacher's Profile, click Teachers under Admin Panel from the menu on the left side of your screen.

Click the name of the Teacher whose profile you wish to view.
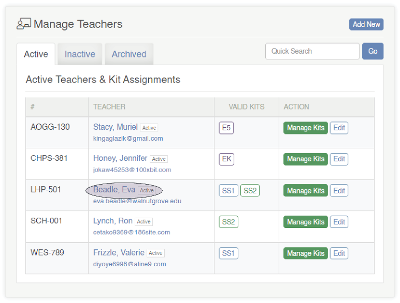
The Teacher's Profile will display their:
- Contact information
- Active Kits
- Student Groups
- Students
- Recent Teacher Activity
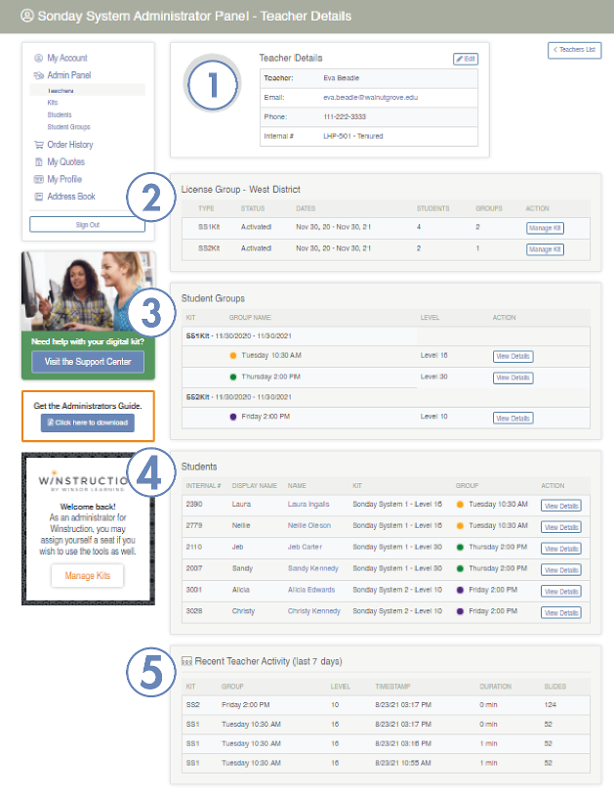
Click Manage Kit to add, change, or revoke a Kit Assignment for this Teacher.

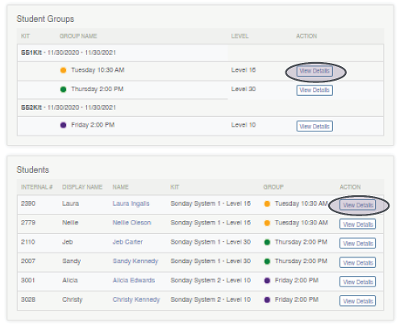
Click View Details next to any Student Group or Student to see more information.
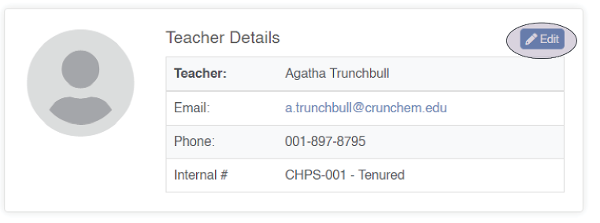
To edit the Teacher's Internal Number, Internal Type, and/or Active Status, click Edit in the top right corner of their contact card.
Note: Only the teacher can modify the rest of the information on their profile.
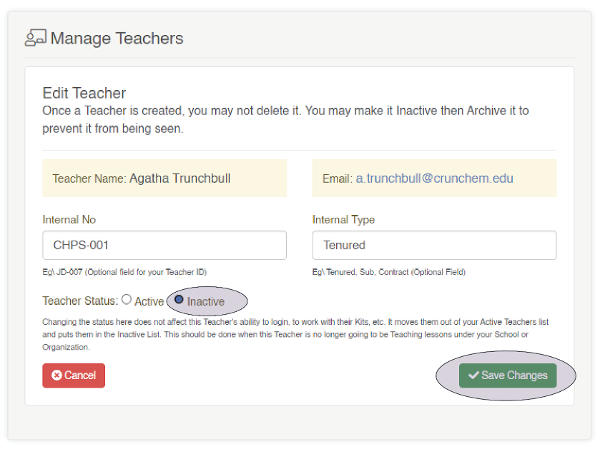
To prevent the profile from appearing in the Active tab, change the Teacher's status to Inactive, then click Save Changes.
Note: Inactive and Archived statuses can be changed at any time.
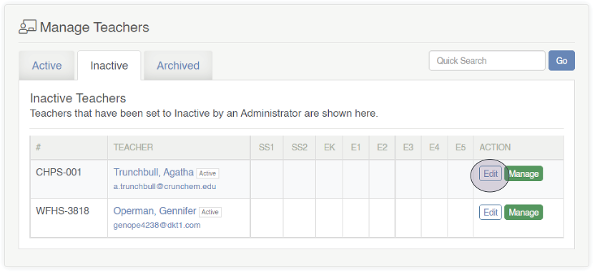
This will take you to the Inactive Teachers tab. Click Edit next to the teacher's name.
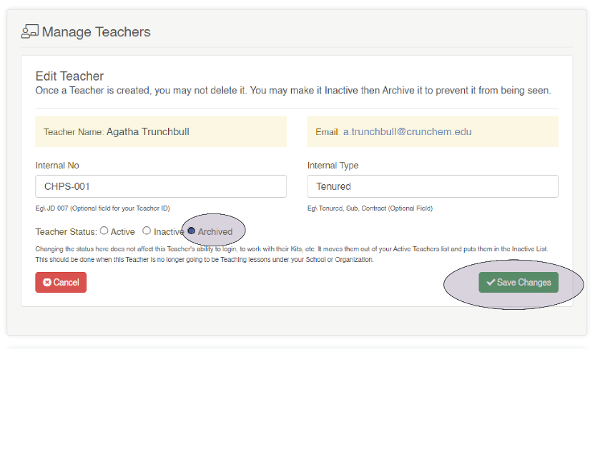
Change the Teacher Status to Archived then click the green Save Changes button.
Teacher profiles cannot be deleted but can be set to Inactive. This will not prevent the teacher from logging in to their Winsor account. If you need to deactivate a teacher's profile completely, please reach out to support@winsorlearning.com.
To set a teacher's profile to Inactive, log into your admin account at winsorlearning.com. Click Teachers under Admin Panel from the menu on the left side of your screen.

Click the name of the Teacher whose profile you want to modify.

Click Edit in the top right corner of their contact card.

To prevent the profile from appearing in the Active tab, change the Teacher's status to Inactive, then click Save Changes.
Note: Inactive and Archived statuses can be changed at any time.

This will take you to the Inactive Teachers tab. Click Edit next to the teacher's name.

Change the Teacher Status to Archived then click the green Save Changes button.

Note: Only teachers can add and edit Student Groups and Students.
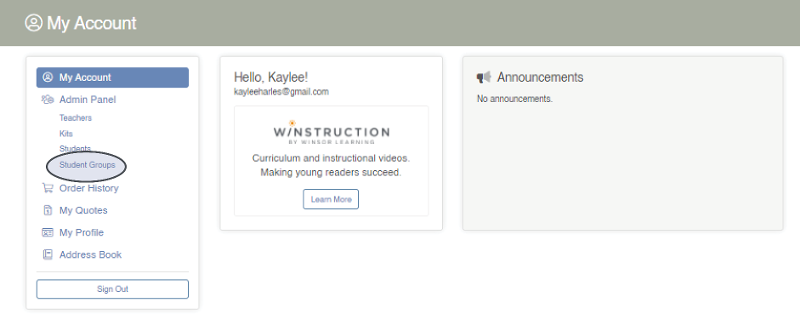
Click on Student Groups from the menu on the left side of your screen or click Manage Groups from your Admin Panel screen.
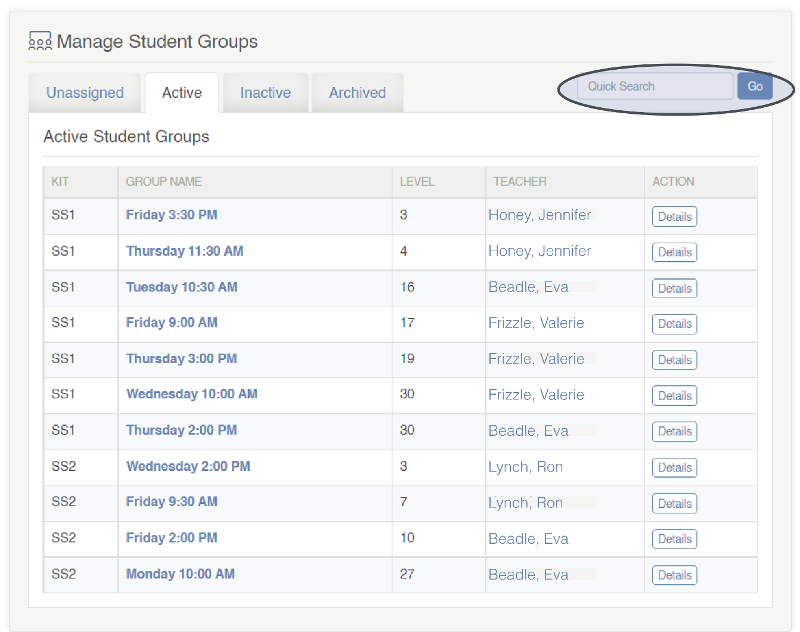
All Student Groups will be displayed under four tabs: Unassigned, Active, Inactive, and Archived. Each Student Group is listed with its Kit, Group Name, Level, and Teacher.
To search within the listing under one of those tabs for a Group by name (ex: Monday), type the name in Quick Search and click Go.
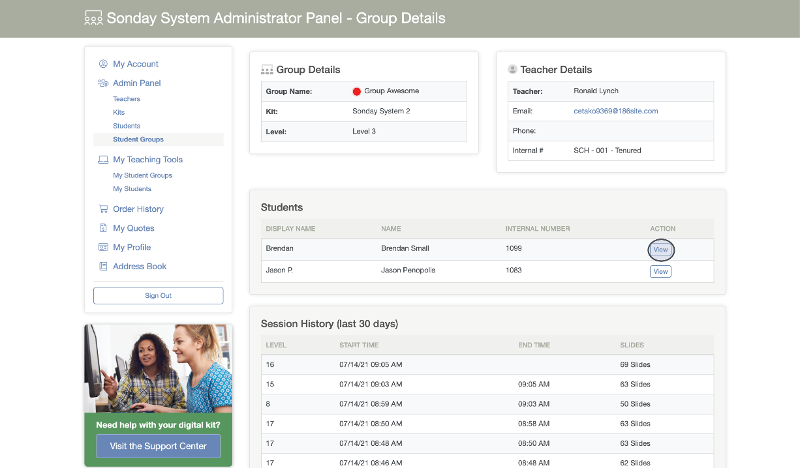
To view a Student Group's Assigned Students and Session History for the past 30 days, click Details next to the group's name. Session History lists group activity for last 30 days, including the level, date, start/end time, and number of slides viewed for each Session.
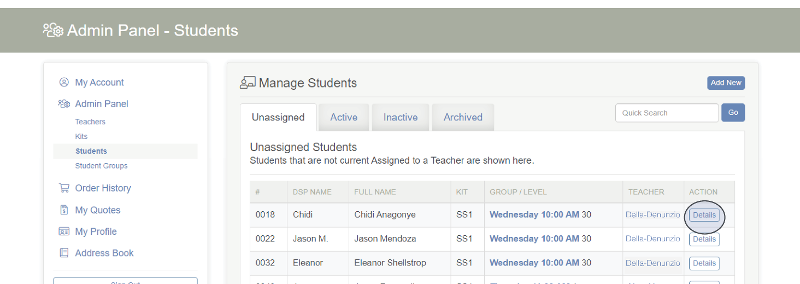
From here, you can also view an individual Student's profile by clicking View next to their name.
Only teachers can add or edit Students and Student Groups for their assigned kits. If you are an administrator and you have kits assigned to you for teaching, you will be able to create and edit Students and Student Groups for those kits.
As an administrator, you can view information for Student Groups by clicking Student Groups from the menu on the left side of your screen or clicking Manage Groups from your Admin Panel screen.

To grant administrative functions to another user:
Log into your admin account at winsorlearning.com.
Click Admin Panel under My Account from the menu on the left side of your screen.

Click Manage Administrators.
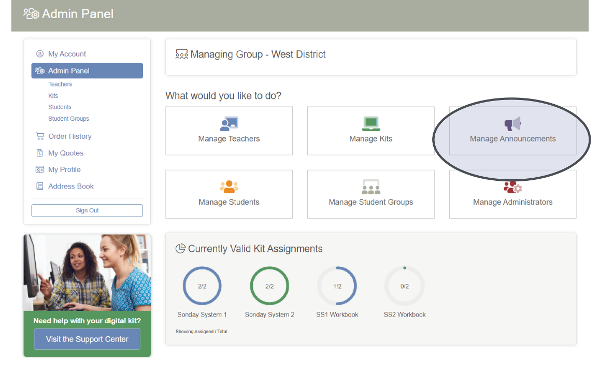
Click Add New Administrator.

Type the user’s email address in the designated field and click Add.

Click Send Activation Email.
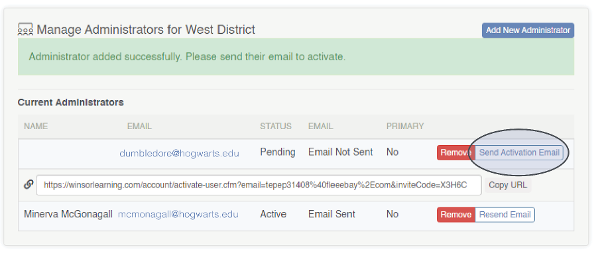
If the administrator is not receiving the automated emails, click Copy URL so you can send the link manually.
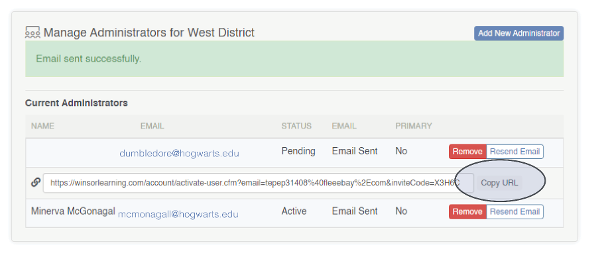
Once the Administrator activates their Winsor account, they will appear as Active under Current Administrators. Only Primary Administrators can add or remove Administrators; otherwise, all other functions are available to Non-Primary Administrators.

Log into your account at winsorlearning.com.
Click Admin Panel under My Account menu from the menu on the left side of your screen.

Click Manage Administrators.
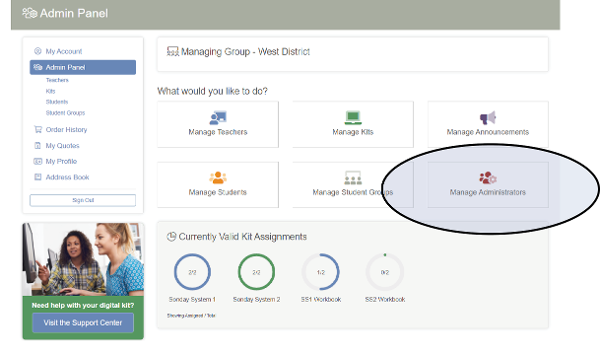
Click Remove next to the administrator’s name you wish to delete.

A prompt will appear asking if you are sure. Click OK.

The user will no longer have administrative functions or access.
If access to the primary administrator’s account has been lost, please contact support@winsorlearning.com for assistance.
Note: Only Primary Administrators can add or remove Administrators.
No, users do not receive email notifications regarding announcements.
Users can view posted announcements when logged into their account at winsorlearning.com.
First, check the status of the kit. Log into your admin account at winsorlearning.com.
Click Teachers under Admin Panel from the menu on the left side of your screen.

Click the green Manage Kits button next to the teacher's name.

Click SELECT for the kit you wish to view.
- If the status is listed as Pending Send, click the green Send Email Invite button.
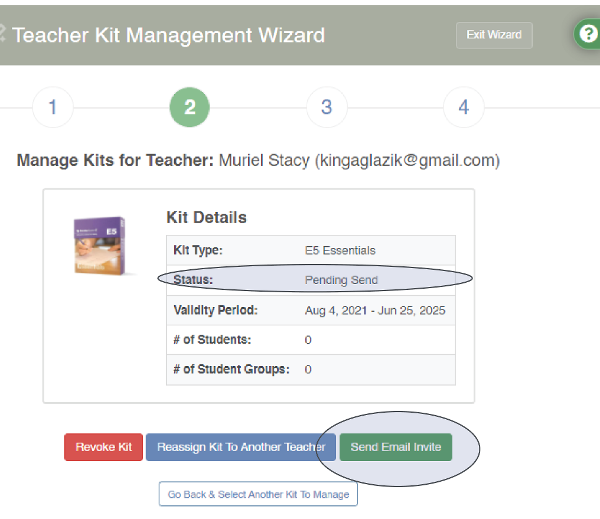
- Another prompt will appear. Click the green Update Kit Status & Send Email Invite Now button.

- Another prompt will appear. Click the green Update Kit Status & Send Email Invite Now button.
- If the status is listed as Email sent, click the green Resend Email button and have the teacher check their inbox, including their spam folder, for the invitation from Winsor Learning.
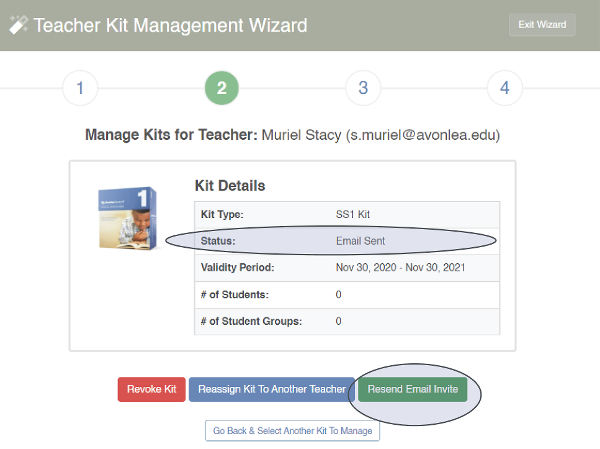
If you have verified the email address is correct and the teacher is still unable to locate the email, reach out to support@winsorlearning.com for assistance.
Only teachers can view the Follow Codes for their groups. If needed, ask the teacher to provide the Follow Code for a specific group.
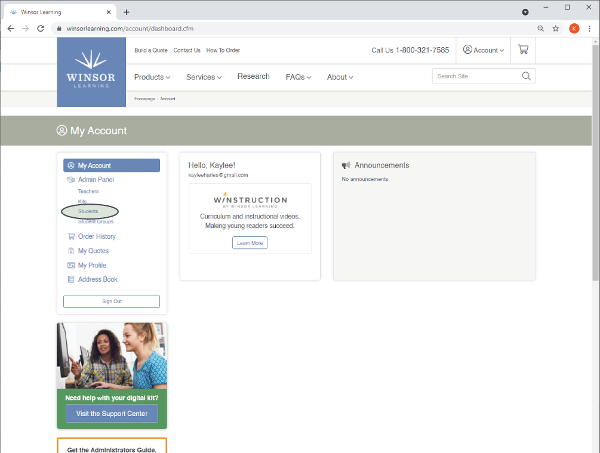
Log into your admin account at winsorlearning.com.
Click Students under Admin Panel from the menu on the left side of your screen.
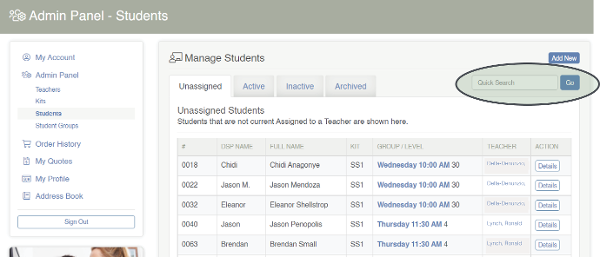
Click on the tab that describes the kind of student (Unassigned, Active, Inactive, or Archived) you're looking for. Type the student's complete or partial name in the Quick Search field and click the blue Go button.
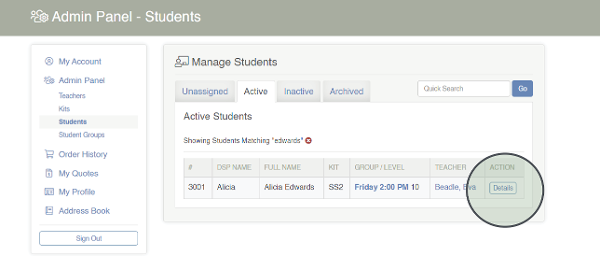
Click Details next to the name of the student whose results you wish to view.
If the student has completed any assessments with the TRB Kit, the test results will be displayed under the Record tab.
